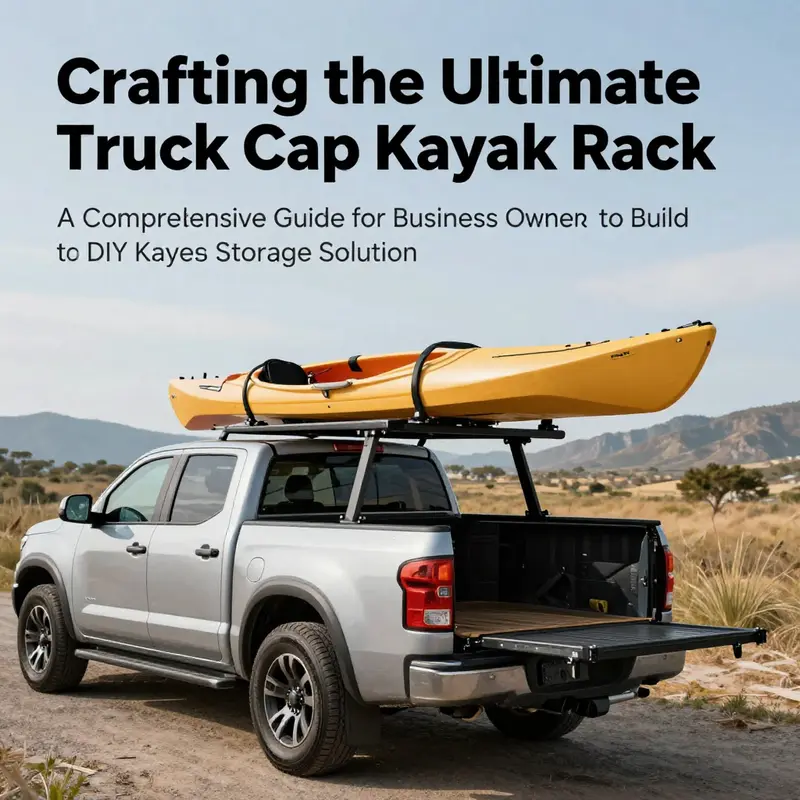
As a business owner invested in outdoor adventures, especially kayaking, it’s essential to have a reliable storage solution that fits efficiently within the confines of a truck cap. This guide meticulously outlines how to create a DIY truck cap rack tailored to your kayak’s needs. Each chapter dives deep into the key considerations, detailed steps, necessary materials and tools, frame design, and safety testing to ensure your kayak travels securely and without damage. By the end, you’ll have the know-how to create a kayak rack that not only fits your vehicle but also prioritizes accessibility and durability.
Rugged on the Road: Designing and Building a Truck Cap Kayak Rack That Stands Up to Weather, Weight, and the Long Haul
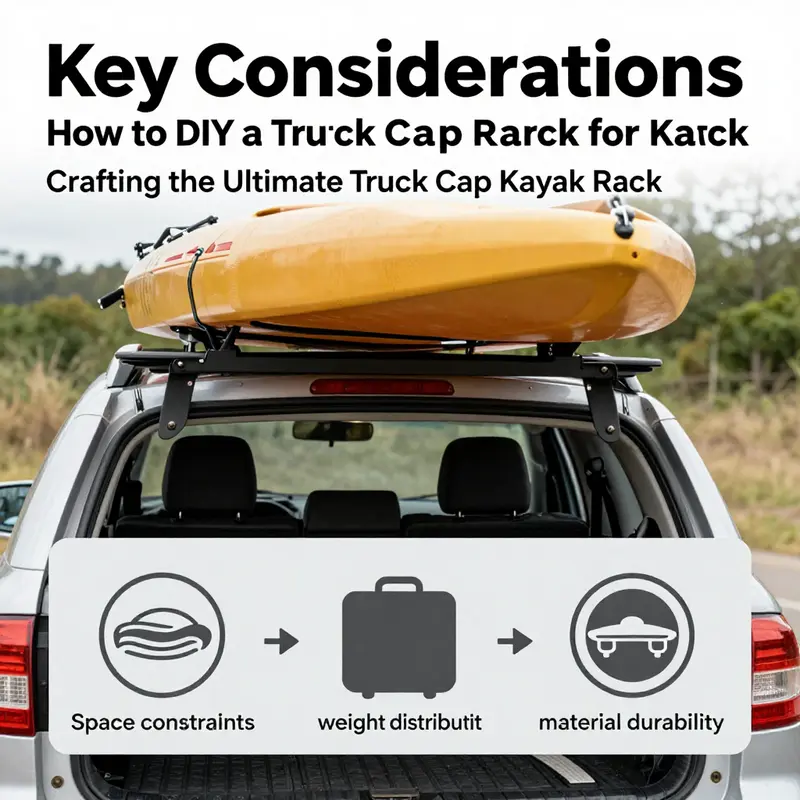
A truck cap sits higher than a bed, and that elevation brings its own set of opportunities and challenges. The goal of a DIY truck cap kayak rack is simple in theory: create a compact, sturdy resting place for a kayak that survives sun, rain, vibration, and the occasional pothole, while staying out of the way of daily use inside the cap. In practice, the design needs to respect space constraints, distribute weight evenly, and survive the realities of long hauls. When you begin, picture the cap as a small, weatherproof chamber that can cradle a single hull or, with smart planning, a second hull if needed. The rack should feel like a natural extension of the cap, not a bulky add-on that rubs against the doors or chips the paint. A well-executed build is quiet at speed, simple to load, and easy to remove when the season ends, yet robust enough to hold a kayak securely through sun, rain, and the inevitable bumps along the highway. The guiding principles here—space efficiency, weight distribution, material durability, secure mounting, and thoughtful protection—layer together to form a dependable system that travels as far as your plans take you.
Secure mounting is the backbone of any truck cap rack. The cap’s interior is not a limitless canvas; it’s a frame and a seal that were not designed to bear heavy, dynamic loads from a hull. That means you want hardware that is rated for outdoor use and corrosion-resistant, ideally stainless or anodized, and you want to anchor the rack into the cap’s frame rather than simply into the lining or a weak spot. Pre-drilling becomes a defensive habit here, reducing the risk of cracking the cap material and giving you clean, accurate holes for bolts and brackets. If your cap has existing cross members, you can tie your uprights into those points, but if not, you’ll need vertical supports that bite into the walls in a way that spreads the load rather than concentrating stress at a single point. In this setting, the choice of brackets matters: lightweight aluminum or stainless pieces that won’t rust or corrode after a season of sun and spray are worth paying for, even if they cost a bit more upfront. The frame you design should feel integrated, almost a natural extension of the cap rather than a separate cage bolted to the top.
Weight distribution follows from secure mounting. A kayak carries its mass along the hull, and the rack must translate that mass into stable contact points. At minimum, aim for contact at the bow, stern, and a supported midsection if the hull length demands it. Padding under the hull is not a luxury but a necessity. Foam strips or rubber sleeves cushion the hull and distribute pressure more evenly across the contact points. Without padding, you risk hull deformation and the maddening sound of metal on fiberglass at highway speeds. The contact points should be positioned so that the hull rests on the padded supports rather than on hard edges that can nick or crush the surface of the kayak. The crossbar that joins the vertical supports should be strong enough to resist deflection under load. If your cap interior is asymmetrical or narrow, you may opt for a lighter, shorter crossbar and closer, more frequent cradles rather than a single long span that could flex.
Centering the weight is a subtle but crucial factor in handling. When the kayak’s weight is centered over the wheelbase, the vehicle’s dynamics remain predictable, reducing sway and wind-induced nudges at speed. If the cap frame allows, position the crossbars to align with the vehicle’s natural balance, nudging the center of gravity toward the middle of the bed rather than toward one side. This is particularly important on windy days or when passing trucks, where a poorly balanced load can produce annoying buffeting or, worse, a whistling or rattling that betrays a loose fit. If your rack is adjustable, a small shift of the crossbar can restore balance after you load gear or swap kayaks. The aim is a calm ride in which the kayak behaves like a single, well-supported payload, not a loose object that crabs into air pockets or bangs against the cap with every bump.
Secure strapping seals the deal. You want high-quality, non-slip straps designed for outdoor use and UV exposure. Ratchet straps provide redundant tensioning that remains secure after heat, cold, and hours of vibration. Use straps at the bow and stern and add a center strap if the hull length and rack spacing call for it. Remember: the straps are your secondary line of defense once the hull sits on padded supports. Before every trip, take a moment to pull each strap tight again, then check them again at intervals during the drive, especially after long stretches on rough pavement. Redundancy matters here; a single strap can fail, and you don’t want a hull rolling free in a journey. It’s also wise to weave straps through the rack’s framework in a way that minimizes slippage and distributes tension across a broader area of the contact points. A small tie-down system that nests neatly with the crossbar can provide an extra layer of security without complicating loading or unloading.
Access and storage considerations influence every measurement you take and every cut you make. The rack should be designed so loading is straightforward. Height should clear the cap’s interior edges while keeping the kayak above any seals or doors so that you don’t trap water or dirt between hull and steel when you drive through rain. If needed, design the crossbar in a way that can be removed quickly or folded down for storage when the cap is opened, preserving interior space for camping gear or fishing supplies. A practical rack respects the cap’s silhouette and doesn’t intrude on daily operations. When you plan for a second kayak, space and weight multiply, so you’ll increase cross-members and perhaps add a lighter second cradle to prevent hull contact and mutual abrasion. It’s a balance of compact footprint with sufficient redundancy to avoid hull-to-hull contact during transit.
Durability and materials guide every choice from the first cut to the final bolt. Aluminum stands out for its lightness and corrosion resistance, an ideal combination for exposure to salty air and rain-swept mornings. If you prefer wood for non-structural trim, sealants and coatings can help it resist moisture, but for the main frame, a metal backbone is safer. Steel should be avoided unless you’re using galvanized or powder-coated varieties; otherwise, rust will become an unwelcome travel companion. Where the rack touches the kayak, cushion points are non-negotiable: rubbers and foam protect the hull from scratches while dampening vibrations that might otherwise creep along the hull. All fasteners should be stainless or similarly coated to resist rust; the last thing you want is a corroded bolt compromising the rack’s hold on a rough highway. The design should favor simplicity and minimal exposed joints that can accumulate grit or trap water; fewer joints also mean fewer leak points and less maintenance over the season.
Weatherproofing and finish are more than cosmetic. The moment you finish, seal joints with marine-grade sealant or a silicone variant to keep moisture from sneaking into the frame. Foam sleeves around contact zones do double duty as cushions and dampeners, reducing both noise and wear. If you plan to store the kayak on the rack during off-season months, consider a modular, easily removable frame that you can take apart for winter storage. The aim is a clean, serviceable build that doesn’t demand a full toolbox every time you unmount or remount. The most satisfying builds are those you hardly notice once they’re in place—quiet, secure, and predictable.
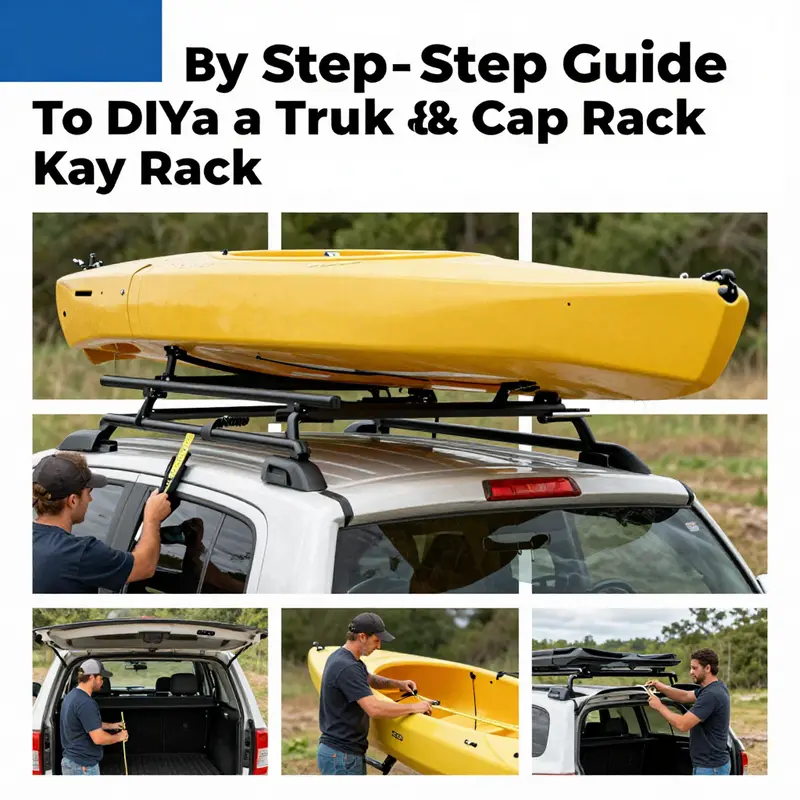
A practical approach to building develops as you measure the cap interior and sketch a frame that can be assembled with common tools. Start with the width and height inside the cap, leaving a couple of inches of clearance on each side. A simple U-shaped frame—two vertical supports attached to the cap walls with brackets or clamps, linked by a crossbar—offers a robust baseline. Secure the vertical supports with pre-drilled holes to prevent cracking, and ensure they sit plumb using a level. The crossbar should be centered and stout enough to support the kayak’s weight; fasten it with brackets or clamp fittings that bite into the structure rather than slip under load. Add adjustable J-hooks or padded cradles along the crossbar at bow, stern, and center. Each cradle should cradle, not clamp, the hull, so the kayak can settle into place with minimal pressure on any single point. Wrap every metal contact area with rubber padding or foam sleeves to preserve hull finish and extend rack life. When you test-fit your setup, simulate loading the kayak gently at first, then increase to full weight and take a slow drive to listen for rattle, flex, or creeping movement. Any wobble or misalignment is a signal to re-check bolts, re-position cradles, or re-balance the load.
The build story doesn’t end with assembly. Security in transit means planning for the long haul. Beyond straps, consider a simple locking mechanism or anti-slip tie-down configuration that discourages opportunistic tampering. If you will leave the kayak on the cap overnight, you want redundancy in how you secure the hull and in the way you close the cap to minimize wind-driven movement. Documenting your load, route, and checks becomes part of a routine that travels with you, giving you a mental checklist that eases the nerves on unfamiliar roads. This isn’t merely a hardware project; it’s a small system designed to protect a precious, often expensive hull and the vehicle that carries it. The result is a rack that feels like it belongs to the truck, not a gadget you bolted on in a moment of inspiration.
For readers who want to situate this project within a broader design vocabulary, the core principles align with the logic of established roof rack systems—compact fit, structural integrity, and protective contact points. If you want to explore broader context or learn how professionals think about crossbars, cradles, and mounting strategies, check out the roof racks guide for a broader perspective on how different roof types influence rack geometry and load transfer. This external reading provides a conceptual frame that helps you match your DIY approach to proven engineering thinking. For additional context on roof-mounted storage, see the roof racks guide.
Inspiration can come from many places, and the hands-on nature of this project invites experimentation. The right balance of materials, placement, and tension produces a rack that carries momentum rather than friction, that endures summer heat and winter road salt, and that makes loading the kayak a simple, almost effortless task. When you step back and test your rig on a quiet road, you’ll feel the difference between a rack that’s merely functional and one that acts as a true partner on the road. The kayak sits securely, the cap remains weather-tight, and the whole assembly moves in concert with the vehicle rather than resisting it. The road ahead becomes a promise rather than a challenge, and your DIY rack becomes a quiet, dependable anchor for every adventure you plan to chase.
External inspiration and further ideas can be found at a wide range of online sources that showcase outdoor storage concepts. For additional inspiration, refer to a Pinterest board that gathers practical, real-world layouts and inventive solutions for truck-mounted kayak storage: https://www.pinterest.com/pin/diy-truck-kayak-rack-529764837145322188/.
null
null
Gear, Metals, and Tools: What You Need to Build a Sturdy Truck Cap Kayak Rack
Materials and Tools You Can Count On
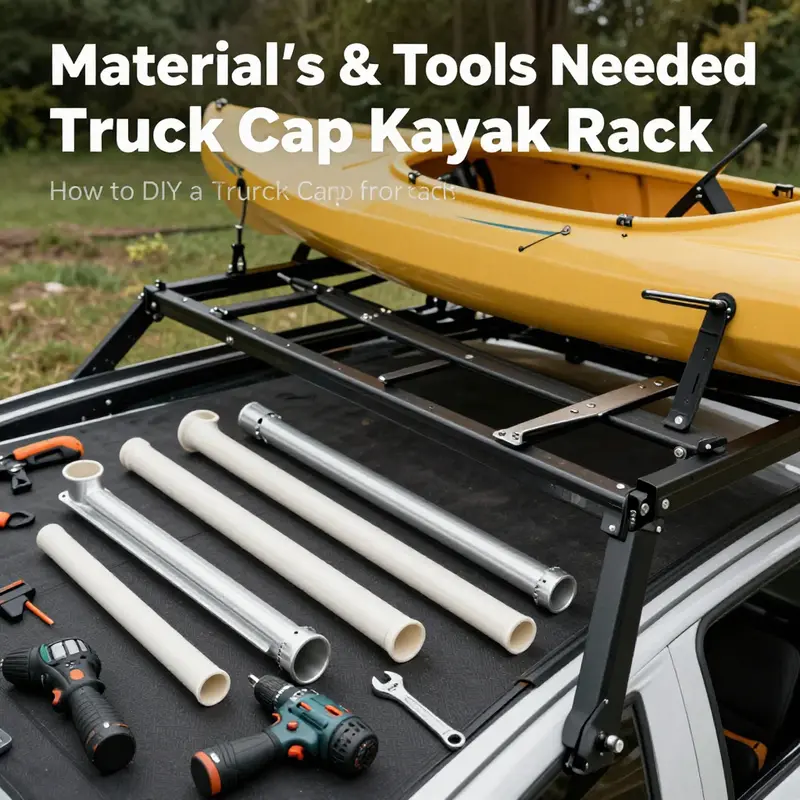
A reliable truck cap kayak rack starts with the right materials and a concise tool kit. Choose components for durability, corrosion resistance, and simplicity of installation. For the frame, aluminum tubing or treated steel are the two practical choices. Aluminum is light, resists corrosion naturally, and is easy to drill and bolt. Treated or galvanized steel offers high strength and cost efficiency, but it needs protective coatings to avoid rust. Aim for tubing rated to handle at least the static load of your kayak plus a safety factor for bumps and wind. A common and effective choice is 1″ x 1″ angle brackets for vertical supports and 1.5″ diameter pipes for crossbars. These sizes strike a balance between strength and compactness inside a truck cap.
Mounting hardware deserves careful selection. Use high-strength, stainless or galvanized bolts, nuts, and washers sized to match your tubing and bracket holes. For most DIY rack designs, 1/4″ or 5/16″ stainless bolts work well. Include backing plates or custom-fabricated mounting plates where possible. These spread load across the cap frame and reduce stress at bolt points. If your truck cap material is thin, a laser-cut or custom plate under the bolt heads will prevent cracking and help keep everything tight.
Protect the kayak at every contact point. Wrap crossbars and J-hooks in closed-cell foam or add rubber padding where the hull will rest. Foam sleeves that slide over bars work for temporary padding, but bonded rubber strips glued to brackets provide longer-lasting protection. Avoid abrasive materials and check padding for compression; replace pads when they flatten and no longer cushion the kayak.
Choose adjustable J-hooks or cradles that offer secure support for the hull while allowing easy loading. J-hooks are compact and adjustable; cradles conform to the kayak hull and distribute weight more evenly. Position them to support the bow, stern, and a mid point if the kayak is long. Each contact point should prevent lateral movement without stressing a narrow section of the hull.
Consider tie-downs as part of the materials list. Ratchet straps or cam straps rated for outdoor use keep the kayak firmly in place during transit. Adding locking points or simple padlocks to your strap anchors increases security. For damp or salty environments, use stainless steel hardware and synthetic straps that resist rot.
Optional extras that make the rack work better include: rubber grommets for drilled holes, marine-grade sealant to stop water ingress around fasteners, and small blocks or spacers to fine-tune clearance inside the cap. A lightweight weather cover will protect the kayak when parked for long periods.
Practical Tools for a Safe, Strong Build
You don’t need an industrial shop to build a dependable rack. A modest, well-chosen toolset lets you work cleanly and accurately. Start with accurate measuring tools: a measuring tape, a carpenter’s level, and a square. Measure twice and mark once. The confined space inside a truck cap makes precise measurements essential to avoid costly mistakes.
Cutting metal cleanly is easier with the right saw. An angle grinder fitted with a metal-cutting wheel or a metal chop saw will produce quick, accurate cuts. If you use aluminum, a fine-toothed blade reduces burrs. After cutting, use a file or sandpaper to deburr edges for safety and to avoid damaging padding or the kayak.
Drilling tools must match the materials you cut. A drill with a set of high-speed steel or cobalt bits will handle aluminum and steel. Pre-drill pilot holes before final fastener holes, especially in thin cap material, to prevent cracking. For tapping threads or installing rivet nuts, include a tap set or rivet tool in your kit.
A wrench set or socket set is essential to tighten hardware properly. Use a torque wrench if you want consistent clamping force on each bolt. Over-tightening can deform brackets or strip threads, while under-tightening makes the rack unsafe. A clamp set helps hold pieces in position during assembly and drilling.
Decide whether you will bolt or weld the frame. Welding creates strong, permanent joints but requires skill and safety equipment. For bolted assemblies, include backing plates and lock washers to keep joints tight. If you choose to weld, equip a proper welder, safety shield, and ventilation. Bolted frames are easier to adjust and remove, making them ideal for renters or those who want a semi-permanent solution.
For finishing touches, keep sandpaper, a wire brush, and a rust-inhibiting paint or sealant on hand. These items protect exposed metal and extend the life of your rack. A marine-grade sealant around drilled holes prevents water intrusion into the cap shell and reduces the chance of interior corrosion.
Installation and Safety Considerations to Keep in Mind
Selecting materials and tools is only half the job. Think about how the rack will be mounted and how the load will transfer to the cap and truck. Use mounting plates or distribute loads across larger surfaces to prevent the cap frame from flexing or cracking. If you must drill into the cap, mark locations carefully and inspect for internal bracing to avoid hitting heater lines or fragile trim.
Rubber or foam padding on contact points is not optional. It prevents scratches and helps damp vibration that could loosen hardware over time. When positioning J-hooks or cradles, aim to support the kayak near bulkier sections. If the kayak has narrow midsections, place supports to avoid bending or creating pressure points.
Choose hardware rated for outdoor use. Stainless steel resists corrosion but can gall when mixed with dissimilar metals. Use compatible washers and nuts, and consider anti-seize on threads where appropriate. Seal bolt penetrations with a flexible sealant and check fasteners after the first few trips. A short road test will reveal any wobble or loose fittings you need to correct.
If you want a removable rack, design it with quick clamps or bolt locations that are accessible from inside the cap. If permanence is acceptable, welded mounts increase rigidity. Whichever route you take, make it serviceable. Regular inspection and maintenance are vital for safety and longevity.
Final tips and a helpful resource
Keep the rack compact enough to preserve headroom and access inside the cap. Leave a few inches of clearance on either side so you can load and unload the kayak without scraping. Balance the kayak front to back to avoid stress on the hull and on the cab during transport. Treat this project as both a mechanical and a marine task: protect the kayak like you would a boat, and fasten as you would mount structural cargo.
For general ideas on crossbar and load-distribution strategies, it helps to review similar roof and rack designs. A practical reference on related systems can be found in a guide about roof racks for trucks, which covers mounting principles and load considerations that translate well to a truck cap environment: roof racks for trucks.
For visual inspiration and layout examples, this external guide includes step-by-step photos and concept ideas you can adapt for a truck cap setup: https://www.pinterest.com/pin/1234567890/.
Building a Strong, Space-Smart Frame for Your Truck Cap Kayak Rack
Designing the frame for a truck cap kayak rack starts with a clear goal: secure, compact support that protects both kayak and vehicle. The cap’s interior dictates much of the geometry. Measure inside width, height, and usable length. Note window locations, ribs, and access points. Leave two to three inches of clearance at each side to avoid tight fits. Record the cap’s roof curvature and any interior trimming. Those details determine whether your frame should sit low and wide or higher and centered.
Choose materials that balance strength and weight. Aluminum tubing works well for most DIYers. It offers excellent resistance to corrosion and keeps added weight low. If you prefer steel, use galvanized or powder-coated varieties to prevent rust. Treated hardwood can also form solid vertical supports in low-stress designs, though it needs sealing against moisture. For crossbars, consider smooth-diameter pipe or rectangular tubing. These shapes resist twisting and provide consistent contact for J-hooks or cradles. Wherever metal meets metal, plan to use stainless steel bolts and washers. They resist corrosion and maintain clamping force over time.
Frame shape must follow the cap profile. A simple rectangular base with a centered crossbar often works best. In narrow or low-clearance caps, a U-shaped or trapezoidal frame reduces interference with the cab or tailgate. Place crossbars evenly across the width. They distribute load and reduce point stress on the kayak’s hull. For most single-kayak racks, two crossbars with adjustable J-hooks are sufficient. If the kayak is long, add a third support near the center. For heavier kayaks, or where the hull has a high rocker, aim for three points of contact: bow, stern, and a mid-hull support.
Vertical supports anchor the frame to the cap walls. Use angle brackets or short posts that bolt into the cap’s inner flanges. Pre-drill pilot holes and use rubber gaskets to protect the cap’s skin. If drilling into fiberglass or composite cap material, reinforce the area behind holes with small backing plates or internal washers. That spreads loads and reduces stress concentrations. Where welding is practical, weld joints on metal tubing for permanent strength. In removable designs, bolted joints with lock washers provide strong, serviceable connections.
A raised center or ridge on the frame helps position the kayak. It encourages the hull to sit naturally along its chine or keel. The ridge also promotes water runoff, which reduces pooling inside the cap during transport. Make the raised section slight—just enough to guide the kayak without bending its hull. If you anticipate long trips, coat this ridge area with rubber or foam padding to prevent abrasion.
Contact points require careful protection. Wrap crossbars and hooks with rubber sleeves or dense foam. Use non-slip pads where the frame meets the cap. These pads protect the cap finish and increase friction. For J-hooks and cradle mounts, add closed-cell foam sleeves that resist water absorption. Secure padding with stainless hose clamps or weather-resistant adhesive. If using straps, anchor them to solid points on the frame, not to the foam. Straps should grip the kayak without compressing sensitive hull areas.
Balance and weight distribution are essential. Position supports to carry load at structural points along the kayak: typically near bow, stern, and midsection. Avoid supporting only the cockpit rim or thin sections of composite hulls. If the kayak has a pronounced rocker or a fragile bow, place an adjustable support there. Make sure the truck’s roof or cap can handle the combined weight of rack plus kayak. Consult your vehicle manual for roof load limits, and stay well under that number. Excess weight shifts handling and increases wear on hinges and latches.
Mounting strategies vary with cap construction. Some caps have internal ribs or flanges ideal for bolting. Others have thin skins where clamp-style brackets work better. If you want a semi-permanent solution, bolt through with backing plates inside the cap to spread load. Use marine-grade silicone around bolt heads to prevent leaks. For fully removable racks, use custom clamps that hug interior ribs without drilling. Reinforce clamp contact points with rubber pads to prevent slippage and protect the cap surface.
Focus on reinforcing likely stress points. Add gussets where vertical supports meet the crossbar. Triangulate corners with short braces to prevent racking. Weld or bolt multiple plates into high-stress areas. When using bolts, choose grade-rated fasteners and tighten them to recommended torque. Periodically inspect these bolts after the first few trips. Re-torque as needed. For aluminum frames, avoid mixing dissimilar metals without proper isolation. Use plastic washers or sealants to prevent galvanic corrosion between aluminum and stainless steel.
Plan for drainage and ventilation. Enclosed caps trap moisture, leading to mildew and corrosion. Leave small gaps in the frame to allow airflow. Avoid continuous horizontal surfaces that collect water. If the crossbar has hollow sections, seal the ends with proper plugs to prevent water ingress. Add small water-drip channels or angled surfaces where pooling might occur. These simple measures extend both the frame’s life and the cap’s interior condition.
When assembling, work in logical stages. Cut tubing to length and deburr the edges for safe handling. Lay out the frame pieces on a flat surface and dry-fit all joints. Use a level to confirm verticals and a square for crossbar alignment. If welding, tack pieces first and recheck the geometry before completing welds. For bolted assemblies, insert all bolts loosely at first. Then tighten progressively in a crisscross pattern to maintain alignment.
Add user-friendly features for convenience. Make J-hooks adjustable so you can reposition supports between trips. Use quick-release pins on crossbar clamps to allow fast removal of the rack. Include recessed anchor points for ratchet straps to secure the kayak. A small foam pad at the loading end protects the cap edge during frequent loading. Consider a removable end-stop that prevents the kayak from sliding forward during braking.
Test the frame thoroughly. Begin with a static load test using a dummy weight equal to the kayak. Check for deflection and movement. Drive at low speed for a short loop with the kayak loaded. Listen for creaks and feel for shifts. Inspect all fasteners and adjust as needed. After a longer trip, recheck mounting points and bolts. Regular inspections catch problems early and avoid damage.
Finish the frame with a protective coating if needed. Powder coating adds durability, though a quality paint for metal surfaces can work too. Seal exposed wood with marine-grade varnish or epoxy. Label adjustment points and add simple markings to speed setup in the field.
A well-designed frame makes kayaking trips simpler and safer. It saves time at launch, reduces wear on gear, and preserves the cap interior. For broader roof-rack planning, see this guide on truck roof racks for compatible ideas and mounting tips: truck roof racks.
For visual step-by-step instructions and expanded build notes, consult this detailed how-to resource: https://www.familyhandyman.com/project/truck-cap-kayak-rack/
Cap-Side Craft: Designing a Durable Kayak Rack for a Truck Cap
Designing a DIY kayak rack for a truck cap begins with a clear understanding of the space you’re working in and the loads your gear will place on the vehicle. A cap runs along the top of the bed, narrowing your options compared to a full-height rack on a traditional roof. The goal is a compact, sturdy, and weather-resistant frame that holds the kayak securely without compromising access to the cap’s interior or the cargo beneath. This requires balancing the cap’s structure with the kayak’s weight and hull geometry, keeping the system simple enough to service, but robust enough to handle routine highway miles or rough farm lanes on a weekend excursion. A practical approach starts with measurement, then moves through a logical frame design, attachment strategy, and careful attention to contact points and load paths. As you sketch the plan, remind yourself of a few nonnegotiables: the rack must be anchored to the cap frame rather than relying on temporary clamps, it must distribute load evenly to avoid localized stress, and it must protect both kayak and cap from abrasion and weather.\n\nBegin with space evaluation. Inside the cap, you need a frame that fits within the narrow width and limited height, yet leaves a couple of inches of clearance on each side for easy loading and unloading. This translates into a compact U-shaped frame that uses two vertical supports anchored to the cap’s sidewalls and a crossbar spanning between them. Aluminum offers a winning combination of lightness, strength, and corrosion resistance, while the horizontal crossbar should be sized to keep the kayak high enough to clear the bed rails and any gear strapped behind it. The design must center the kayak’s balance along the vehicle’s longitudinal axis so that weight is carried through the cap rather than pressing unevenly on one end. In practice, this means positioning the crossbar and supporting cradles so that the hull rests on evenly spaced contact points at the bow, stern, and, if needed, the midsection. A well-planned layout reduces the risk of hull deformation and helps keep the cap’s interior accessible for daily use.\n\nOnce the layout is defined, healthily practical construction comes into play. Secure attachment to the cap is the backbone of safety. The vertical supports can be secured to the cap’s interior framing using stainless steel bolts and pre-drilled holes to avoid cracking or distortion. It’s essential to pre-drill to precise depths and keep the bolt pattern aligned with solid structural elements rather than cosmetic or thin sections of fabric or trim. With the cap’s interior walls reinforced at those mount points, the verticals stand up to torque from gusts or sudden braking. The horizontal crossbar is then connected with brackets or clamp fittings chosen to resist flex while staying within the cap’s interior footprint. The crossbar should be centered, and it should be easy to remove if you ever need to convert the cap back to its stock configuration. The joints should be snug, but not so tight that they inhibit slight alignment adjustments during installation.\n\nThe choice of kayak supports is where the design meets the day-to-day realities of carrying a long, slippery hull. Adjustable J-hooks or padded cradles allow you to fine-tune contact points along the hull. Ideally, you’ll place supports at the bow and stern to cradle the ends and prevent tipping, with one or two midship supports if the kayak’s length warrants extra stability. Padding is not optional here. Foam sleeves or rubber pads at every contact point prevent scratches on the hull and minimize wear on the cap’s paint or finish. The padding should be thick enough to absorb minor bumps without compressing so much that the kayak loses contact. When you set the kayak onto the rack for the first time, tighten the supports just enough to hold it steady and then test by gently rocking the hull to feel where any pressure points emerge. Readjust as needed before you load the full weight.\n\nWeight distribution remains a central concern throughout. The rack path—from kayak contact points into the cap’s frame—must offer a clear, direct route for load transfer. If the cap attaches to a larger truck frame through a single center bolt or a single heavy clamp, the entire system can fail under dynamic loads. A better approach distributes the load via multiple points that anchor into the cap’s structure. That means more bolts, more careful alignment, and, crucially, attention to the cap’s interior space to avoid crowding. It’s tempting to minimize hardware, but a few extra anchors along the verticals dramatically improve stability. The layout should keep the kayak’s weight evenly distributed from bow to stern, and avoid prolonged cantilevered loads that could stress a single mount. In addition, consider adding a secondary tie-down system at the contact points—bungee cords or ratchet straps looped around proper anchor points—to reduce any residual movement during transit.\n\nAerodynamics and wind load are practical realities you must respect, even in a cap environment. A protruding crossbar or exposed hardware can generate unwanted drag and lift, especially at highway speeds. The aim is to keep edges smooth and, where feasible, to streamline the clamps or fairings that cover the crossbar or verticals. If the cap allows, you can add a simple fairing or trimmed cover to reduce turbulence around the rack. The watercraft’s hull and the surrounding air will interact with the mounting, so any sharp edges or gaps create noise and energy loss. Thoughtful contouring and tidy cable management keep the system quiet on the highway and minimize vibrations that could loosen fasteners over time.\n\nSecurity and long-term reliability hinge on durable mounting and thoughtful restraint systems. While aesthetics matter, reliability matters more. A robust DIY rack relies on anchored fasteners rather than relying solely on clamps that can loosen with vibration. Regular inspection becomes part of routine maintenance: check each bolt, re-torque after a few trips, verify that padding remains intact, and confirm that the midship supports still bear evenly. A small but important addition is a simple tie-down plan that uses straps to secure the kayak along critical points of the hull, effectively pinning the load to the crossbar. This combination of secure mounting, padding protection, and redundancy in tie-downs makes the system safer and more forgiving on rough road surfaces.\n\nAs with any custom build, testing is the bridge between concept and everyday use. Start with static testing: apply force deliberately to the rack assembly to simulate road conditions—pull outward, twist gently, push downward—while the entire system is firmly mounted to the cap. Watch for any creaks, flex, or slow loosening of fasteners. If the system holds under these conditions, proceed to a low-speed drive, around 20 to 30 mph, and listen for noise, feel for vibrations, and observe if the kayak shifts at all. If movement occurs, stop and reinforce the problematic joints, add additional padding, or re-check bolt torque before increasing speed. It’s wise to document the tests and adjust the design accordingly. This iterative approach aligns with the broader safety practices used in vehicle-mounted racks, where stability, even load transfer, and resistance to sway are central to preventing damage to the kayak and the cap.\n\nMaintenance and adaptability also deserve emphasis. A cap rack is not a set-it-and-forget-it solution. Seasonal use, a change in kayak length, or even upgrading to heavier equipment can necessitate adjustments. Keep a simple toolkit on hand for on-the-road tweaks: a few extra bolts, spare washers, and a strip of adhesive padding can save the day when you find a loosened fastener or a scratch that needs cushioning. If your cap is removable or convertible, design the rack to disassemble with a minimal number of steps, so you can switch to other cargo configurations without knifing a margin in hardware. A well-planned DIY rack will not only hold a kayak securely but will also be adaptable to variable loads and different cap dimensions, making it a long-term asset rather than a temporary fix.\n\nFor readers who want to dip into the broader world of rack design and optimization, consider exploring resources that discuss broader concepts like weight distribution, secure attachment, and anti-sway features in vehicle-mounted systems. A related discussion on the broader topic, such as how professional roof racks optimize space and strength, can provide valuable context and design insights. See the guide on roof racks for trucks for further exploration. https://trucksdiy.com/blog/roof-racks-for-trucks/\n\nExternal resource: as you finalize your build, consult authoritative guidance on structural integrity and load-testing practices to inform safe, durable design decisions. A practical external reference focused on truck bed kayak racks emphasizes stability, load distribution, and secure tie-downs for vehicle-mounted racks. https://www.boatdocking.com/kayak-racks/truck-bed-kayak-racks/
Final thoughts
Creating a DIY truck cap rack for your kayak can significantly enhance your outdoor experiences by offering a sturdy, secure, and weather-protected storage solution. By considering key factors such as space constraints and material durability, opting for the right tools and materials, and following a step-by-step process, you can build a rack that is not only functional but also tailored to your specific needs. Safety testing will ultimately provide peace of mind when you hit the road for adventures. Invest the time in this project, and you’ll have a reliable solution that supports your kayaking ambitions for years to come.