Truck bed drawers are an essential upgrade for business owners seeking better organization and accessibility in their vehicles. By building your own, you can tailor the dimensions and features to suit your specific needs, whether for tools, equipment, or merchandise. This guide will delve into the crucial materials and tools you need, provide a detailed step-by-step instruction process, discuss finishing touches for durability, and suggest customization options for maximum utility. Each chapter will equip you with the knowledge necessary to create a fully functional and aesthetically pleasing truck bed drawer system.
Build-Ready: The Complete Materials and Tools Guide for DIY Truck Bed Drawers
Materials and Tools: What to buy, what matters, and how to choose the right components for lasting truck bed drawers
A durable, functional set of truck bed drawers starts with smart choices about materials and tools. The drawer boxes, slides, fasteners, and finishes determine how your drawers perform under load and exposure. Choose components for strength, weather resistance, and ease of service. This chapter walks through each essential item, explains what to look for, and offers practical tips to avoid common mistakes.
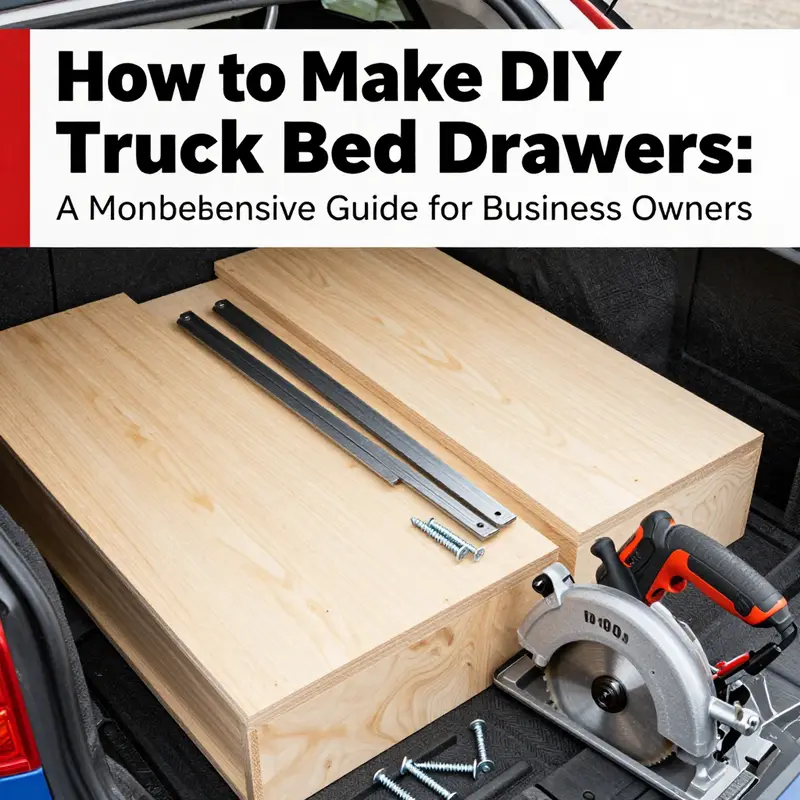
Begin with the structural material. Use exterior-grade plywood at 3/4 inch thickness for the drawer boxes. High-quality birch or marine-grade plywood resists warping and delamination better than interior-grade panels. If you prefer solid wood for visible faces, use hardwoods like oak or maple for drawer fronts, but keep the box itself plywood to control weight and stability. Cut panels square and sand edges smooth. Seal the edges with thin coats of finish before assembly to reduce moisture ingress.
Drawer slides are the mechanical heart of the system. Opt for full-extension, ball-bearing slides rated for heavy loads. Full-extension slides give access to the entire drawer without leaning into the bed. Look for slides with load ratings that exceed the expected weight of tools and gear by at least 25%. Choose slides with metal contact surfaces treated for corrosion resistance. When mounting slides to the bed floor or side rails, ensure the mounting points accept the screw sizes supplied with the slides; if not, add properly sized backing plates under the bed floor for a secure attachment.
Fasteners and brackets must match the environment. Use corrosion-resistant screws and bolts, such as stainless or zinc-plated hardware, especially if the drawers live under an open cover or are exposed to road salt. Wood screws should be designed for plywood, with coarse threads to grip the veneer core. For joints that will see heavy shear loads, use bolts or carriage bolts with washers and lock nuts rather than relying solely on screws. Reinforce internal corners with metal corner brackets for added long-term rigidity.
The drawer bottom requires attention. A bottom panel slightly smaller than the box interior allows for seasonal movement. Rout or sand a half-inch clearance along the long edges when you cut the bottom, or use a dado or ledge to seat it securely. If you plan to haul heavier loads, consider a double-bottom design with a thin structural sheet sandwiched to distribute point loads.
Sealing and finishing protect your investment. Use exterior or marine-grade varnish, sparing coats of polyurethane, or a waterproof paint formulated for wood. Apply at least two coats to the outside faces and three thin coats to interior faces. Pay special attention to edges; they absorb moisture fastest. If you want a natural look, use a penetrating oil finish where appropriate, then top with a clear protective coat. For extra protection, line drawer interiors with rubber matting or foam liner to keep tools from rattling and to prevent moisture pooling.
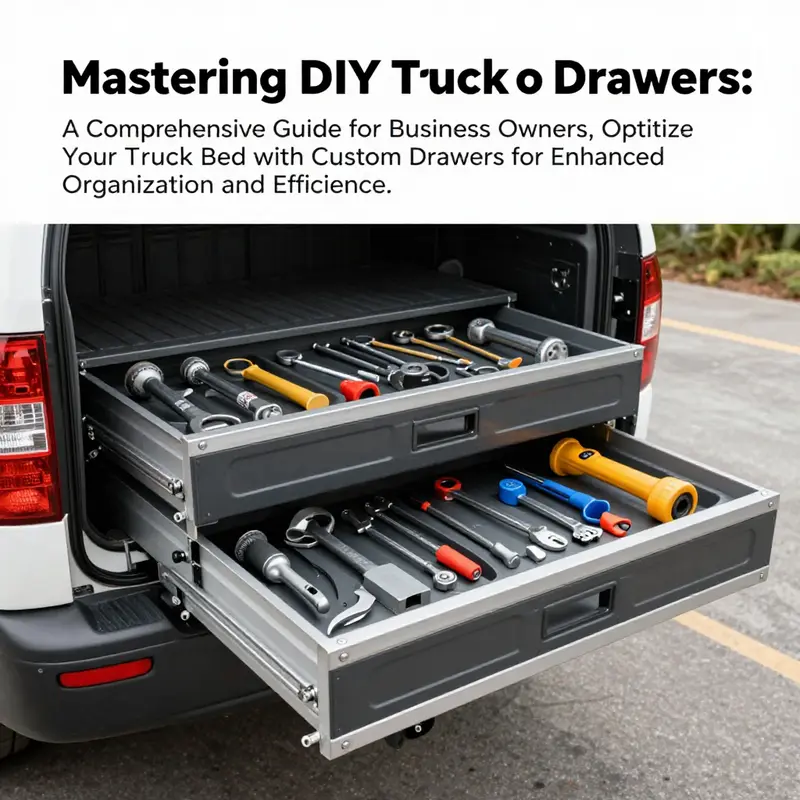
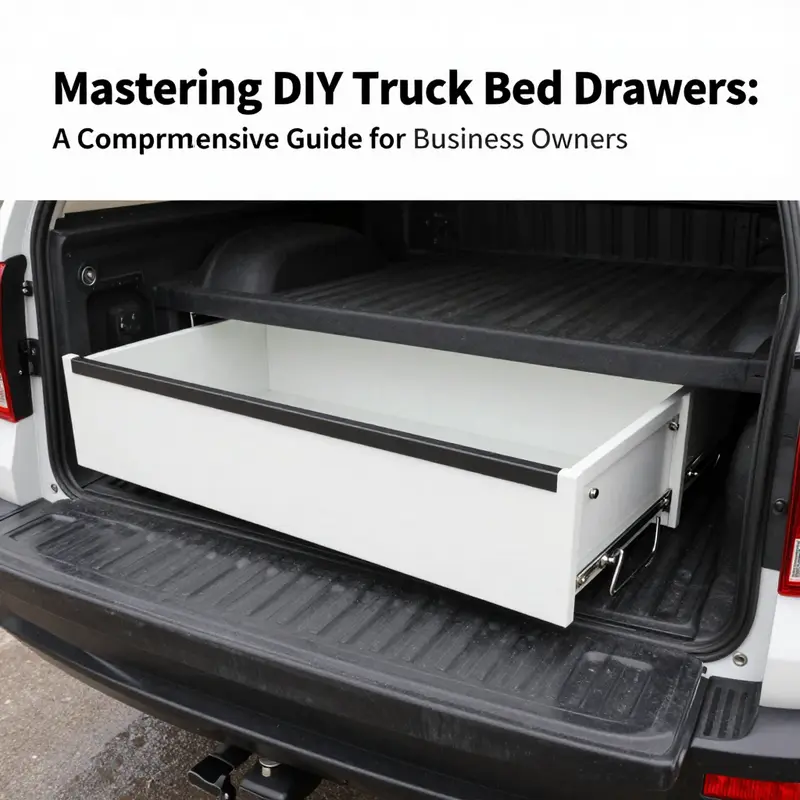
Handles, locks, and retention hardware turn a box into a usable drawer system. Install recessed pulls or flush handles to avoid snagging cargo. For security, fit a locking mechanism tied into the truck’s tailgate or a separate lock system. Magnetic catches or spring-loaded latches are helpful for keeping drawers closed on rough roads. Choose hardware rated for frequent use and outdoor exposure.
Tools are nearly as important as materials. A circular saw or table saw is essential for clean, straight cuts. A jigsaw helps with curves or notches for wheel wells and tie-downs. Use a drill with both drilling and driving bits, and keep a set of high-quality countersink bits to recess screw heads. Bar clamps or parallel clamps hold joints tight while glue cures. A tape measure with fractions or millimeter marking, a reliable square, and a level ensure boxes are true and slides align perfectly.
A screw gun or impact driver speeds assembly and helps prevent stripping screws. For sanding, an orbital sander saves time and yields an even finish. Keep several sandpaper grits on hand—80 grit for initial shaping, 120 for smoothing, 220 for preparing for finish. When painting, a small foam roller produces a smooth surface for flat panels, and a brush tackles edges and corners.
Select adhesives and fillers with exterior use in mind. Polyurethane wood glue expands slightly and fills gaps. Use epoxy or marine adhesives in areas exposed to severe moisture or where bonding metal brackets to wood is required. For filling screw holes and small defects, use a paintable, exterior-grade wood filler, then sand flush once dry.
Planning for mounting and clearance saves rework. Measure the truck bed interior carefully and account for any protrusions, wheel wells, and bed liners. Leave at least 1/4 inch of clearance on each side of the drawer box for smooth travel. When planning stacked drawers, allow enough vertical clearance for slide thickness and a small gap to prevent rubbing. Mock up the largest drawer first with scrap plywood and test the fit, movement, and access before building the rest.
Consider weight distribution and anchoring. A heavy set of drawers shifts the truck’s cargo center. Mount the cabinet securely to the bed floor using bolted brackets into factory anchor points or through the bed with sealed fasteners. If drilling through the bed, protect exposed metal with sealant and paint to prevent corrosion. Use rubber or neoprene pads between the drawer unit and the bed floor to dampen vibration and reduce wear.
Small accessories improve usability. Foam drawer liners prevent tools from sliding and reduce noise. Rubber bumpers or felt pads at slide ends soften closure and reduce metal-on-metal contact. Label holders or recessed tags on the drawer fronts speed organization. Consider removable dividers for adjustable storage layouts.
If you want a faster route, under-bed drawer kits exist that bundle matched slides and mounting hardware. A kit can save time if you prefer to avoid custom slide selection. However, a custom build wins for fit and finish when you need non-standard dimensions or want a particular aesthetic.
Safety and maintenance extend lifespan. Pre-drill screw holes to avoid splitting plywood. Use proper personal protective equipment when cutting or sanding. Check slide fastenings periodically and tighten loose screws. Reapply finish where wear shows, especially at edges and drawer faces. If you notice moisture intrusion, pull the drawer, dry the cavity, and re-seal edges before reassembly.
Finally, budget for quality. Spending slightly more on corrosion-resistant slides and durable plywood pays off in years of reliable service. Balance cost versus expected use. Keep receipts and note manufacturers and sizes of critical components so replacements match later.
For planning materials, cut lists, and printable layouts that match these recommendations, see the detailed plans available in the DIY truck bed drawer PDF linked in the project resources. To explore related accessories that enhance a truck storage system, check this page on truck accessories: truck accessories.
External plans and printable templates are helpful for exact cuts and slide placement. Find a complete set of drawer plans and diagrams here: https://www.scribd.com/document/528198760/DIY-Truck-Bed-Drawer-Plans-PDF
Between Bed Rails and Hidden Depths: Building DIY Truck Bed Drawers That Stand Up to the Road

The moment you start planning a set of drawers for a pickup bed, you’re not just laying out storage; you’re choreographing a compact workshop that travels with you. A well-made system feels like a built in part of the truck rather than a temporary add on. The aim is to craft drawers that stay true under vibration, shed moisture rather than soak into the grain, and glide smoothly every time you reach for what’s tucked away. The core idea rests on three commitments: precise measurement, a sturdy frame, and reliable hardware that can stand up to road dust, weather, and years of use. Begin with a clear plan for interior dimensions. Measure the bed with a careful eye toward length, width, and height clearance. Leave about a quarter inch of space on each side to let the slides move without rubbing. This small gap matters, especially when things shift during a bumpy road trip or when you load a toolbox that’s slightly taller than expected. It’s worth pulling a sketch pad and rechecking your numbers several times. If you are truly aiming for durability, choose exterior grade plywood for the drawers and the frame. Baltic birch or marine grade plywood in a thickness of three quarters of an inch provides structural stiffness, resists warping, and tolerates moisture far better than regular interior plywood. Avoid the temptation to cut corners with cheaper woods that curl, crack, or swell when rain sneaks into the bed area. Your design is only as good as the materials that support it, so invest in weather resistant panels and fasteners that will hold up to the daily grind of haul, rain, and sun exposure. When you decide how many drawers to build, you are refining the entire silhouette of the system. The simplest and most practical layout is two or three drawers. Placing a large drawer at the bottom can handle heavier items such as power tools or spare parts, with shallower drawers above for smaller items, cords, straps, and gear that you want to access quickly. The layout should reflect how you reach into the bed while standing outside the truck, so the drawers align with your natural reach and do not block wheel wells or bed tie downs. The frame that anchors the whole system can be thought of as a rectangular box that runs along the bed. Use two longer rails to form the top and bottom edges and connect them with sturdy verticals. The final exterior should be flush with the bed wall or just recessed enough to avoid snagging clothing, gloves, or gear as you climb in and out. As you plan, you may also consider whether you want a lip on the front panel or a recessed front for a sleeker look. Either choice should serve two practical goals: easy access and reliable containment so items do not shift when you hammer down the road. The actual drawer panels then fit inside this frame, turning a simple box into a drawer system that can be loaded, unloaded, and maintained with relative ease. The bottom panel needs a touch of clearance from the frame to avoid binding on the slides; giving it a fraction of an inch of breathing room helps the drawer breathe as it moves. Once the basic frame takes shape, attention shifts to the sliding mechanism, which is the most critical part of the build. The slides are the backbone of a durable drawer system. A heavy duty, full extension slide or a robust pedal operated track is essential if you plan to carry heavy loads. The key is alignment: slide halves mounted to the bed interior must align perfectly with the corresponding halves on the drawer underside. A level is your best ally here; take the time to verify levelness across the entire track before final tightening. If the bed walls are curved or the mounting surfaces irregular, consider shimming or lightly routing to create flat, even surfaces for the slides. When you start fastening, pre drill to avoid splitting the wood, especially if you are using fine hardwoods or marine grade plywood. Secure the slides to the bed with long screws that bite into solid wood or structural members. The adjacent drawer portion should slide in and out with minimal resistance; if you notice binding, pause and realign the tracks before forcing the motion. In some setups, adding a tiny amount of lubricant designed for metal slides helps reduce friction and wear over time. For additional convenience, you might explore pedal operated release mechanisms. They can enable you to deploy a drawer hands free, which is particularly handy when your hands are full or when you are wearing gloves. This is an upgrade that can transform the daily workflow of loading and retrieving gear in the field or on a job site. After the slides are installed, the drawer panels begin to take their final shape. Cut each panel to fit inside the frame and secure them with screws so the front, back, and sides form a rigid, square box. The bottom panel should be slightly smaller than the top frame to prevent rubbing as the drawer travels along the slides. Sand all edges smooth to avoid splinters. A practical detail is to add a small lip along the front edge if you anticipate items sliding forward during motion. The finish stage is not merely cosmetic; it is the line between a drawer that lasts and one that warps or rots. Sealants and protective finishes protect against moisture and sunlight. A weather resistant sealant, stain, or clear polyurethane finish preserves the wood’s appearance while defending against the elements. If you want to keep the wood’s natural look, a clear polyurethane can be enough to protect while preserving grain. For a bolder appearance, and when you want a weather sealed surface that’s easy to clean, a durable outdoor enamel provides robust protection. The choice depends on how aggressively you plan to use the drawers and how much you want their color to influence the truck’s overall aesthetic. Don’t rush the finishing step; allow each coat to dry thoroughly and sand lightly between coats to maintain a smooth surface. The time you spend here pays dividends in durability and longevity on the road or at a campsite. The final touches can be simple yet meaningful. Consider adding handles or pulls that are comfortable to grab and won’t snag on clothing. Magnetic catches add an extra layer of security to keep drawers closed on rough terrain. If you are thinking about security, a locking mechanism can be integrated at the drawer front or the slide assembly to prevent unauthorized access when you are away from the vehicle. You may even choose to add a weatherstrip along the drawer edge to keep out dust and moisture during wet conditions. In many builds, the assembly is completed with a practical, no frills approach rather than an elaborate, showroom finish. The goal is a robust, reliable system that functions in the field as well as in the shop and that does not require constant maintenance or adjustment. As you work through the design, you will see how the drawer size and configuration can change the weight distribution and the bed’s balance. A bottom drawer filled with heavy items will push the center of gravity down and slightly toward the tail, while a top drawer loaded with lighter gear may alter the feel when you step into the bed from the tailgate. You can mitigate any imbalance by planning the drawer placement across the bed and by reinforcing the bed floor where the slides anchor. A well balanced system reduces handling effort, improves driving stability, and minimizes the risk of loosening fasteners from vibration. When the project moves from concept to reality, you will appreciate the importance of testing through every stage. Dry fits before final assembly help catch misalignments. After you mount the slides to the bed and attach the drawer faces, perform exhaustive tests: open and close each drawer under light load, then under a heavy load. Check for noise, rubbing, and any play in the joints. If the drawers wobble, tighten mounting screws and confirm the bed’s mounting points are secure. A quiet glide is a sign of a job well done. The finishing touches you add should be matched to the use case. If you plan to carry liquids or items that could leak, consider adding a splash guard or a simple seal along the interior edges. The drawer fronts can be flush for a minimal look or profiled to offer a bit of grip and personality. Either way, the system should feel integrated with the bed rather than bolted on. This is where the craft of woodworking and the engineering of the hardware converge. Materials, joints, and fasteners become a single system rather than isolated parts. As you visualize the finished product, you may want to compare your plan with established under bed drawer systems and storage kits. These can serve as a practical reference for spacing, mounting points, and how to distribute weight evenly across the bed. Depending on your budget and skill level, you might opt for a fully custom build or a hybrid approach that combines your own frame with prefabricated panels. Either path leads to a clean, professional look that improves the truck’s usability and protects gear from the elements. In this spirit of practical craftsmanship, you can think of the drawer setup as a miniature workshop you carry with you. It stores, protects, and organizes tools, camping gear, and recovery equipment while preserving the bed’s open space for larger items. The result is a more efficient workflow, fewer trips to locate tools, and a space that is simpler to clean after a job or a trip. If you want to explore related ideas and see how others approach vehicle storage, you can explore the truck boxes guide for additional strategies and inspiration. Take a look at the guide here: truck boxes. This resource helps you visualize how drawers fit into larger storage schemes, including how to mount components securely, seal against weather, and tailor drawer dimensions to varied cargo. While this chapter focuses on the build and install process, the broader set of storage concepts can inform not only your design choices but also your expectations for durability and ease of use over time. For a hands-on, visual supplement, several detailed build tutorials are available in external resources. A comprehensive walkthrough of a similar project is available at a well known video source: https://www.youtube.com/watch?v=5qZvKtLpUuQ
Polish, Protect, Perform: Finishing Touches and Ongoing Care for DIY Truck Bed Drawers
When you finish a DIY project, you’re not just sealing a wood box—you’re setting the stage for years of reliable use in a harsh environment. A truck bed drawer system earns its keep through daily ruggedness as much as through clever design. The finishing touches and the ongoing care you choose are the quiet acts that turn a DIY build into a durable work companion. After the heavy lifting of cutting, assembling, and mounting, the real work begins: smoothing the surfaces, protecting them from weather and UV, and building a rhythm of maintenance that keeps the system quiet, precise, and safe. This chapter invites you to see finishing not as an afterthought but as a deliberate, integral phase that stitches together performance, appearance, and longevity. It’s the difference between a box that looks good in a photo and drawers that behave consistently under day-to-day use, road grime, and seasonal moisture.
Smoothing the surfaces is the first and most tactile step. Sanding isn’t merely cosmetic; it reduces snagging and wear, especially where you’ll grip edges or slide a hand beneath a drawer front. Start with a coarser grit to knock down tool marks and splinters, then move through progressively finer grits until the surface feels like satin to the touch. This gradual refinement matters more than you might expect because a fine surface accepts finishes more evenly, resists moisture-driven swelling, and reduces chipping at edges where the box meets the slides. The goal is to create a uniform base that won’t abrade the seals or undermine the drawer slides over time.
Once the wood is smooth, sealing becomes the shield against the elements. Exterior-grade plywood is a sensible choice here precisely because it resists moisture better than interior-grade stock. Apply a sealant that creates a moisture barrier while allowing the wood to “breathe” enough to prevent warping from trapped humidity. After sealing, follow with a weather-resistant paint or stain. The color or finish you choose should complement the vehicle’s tone and your personal style, but it should also be chosen for durability. A pigmented stain with a clear protective topcoat is often a practical route, because it hides slight imperfections while giving you a multi-layer barrier against UV rays and water. A clear topcoat adds a layer of hard-wearing protection, but it’s crucial to keep it compatible with the underlying sealant. Always test a small, inconspicuous area first to confirm adhesion and curing behavior in your climate.
Topcoats aren’t mere gloss; they are a kinetic line of defense. A polyurethane finish, especially when applied in thin, even coats, can dramatically improve moisture resistance and abrasion tolerance. If you expect more sun exposure, a UV-resistant topcoat helps prevent color fade and wood breakdown. Rolling or brushing on thin coats, with proper drying time between layers, yields a resilient surface that’s easier to clean. In humid or wet climates, you might lean toward tougher, two-part finishes or marine-grade formulations, provided you follow manufacturer directions for mixing and curing. Whatever you choose, the objective remains the same: a durable, even surface that sheds water and resists the chafing that comes from frequent drawer operation and load movement.
Beyond the surface, the finishing touches extend to hardware integration and noise reduction. Weatherproofing isn’t just about the wood; it’s also about how the drawer travels and how it rests when closed. Rubber bumpers at the ends of the drawer runs can cushion hard stops, dampen vibrations, and reduce the likelihood of chipping the finish when a drawer is slammed in a hurry or jostled by rough terrain. Drawer stops are another subtle but effective touch. They prevent over-extension, which can detach slides or bend the box sides over time, especially when you’re carrying heavier loads. If you run multiple drawers, consider labeling the fronts with simple, durable materials or engraved plates so you can locate the right compartment quickly in dim light or when your hands are full of tools.
Of course, the safety of metal hardware deserves attention too. Regularly inspect screws, bolts, and brackets for tightness and corrosion resistance. Vibration from driving can loosen fasteners over months, so a routine check—at least every few months or after long trips—helps avoid rattling, misalignment, or sudden drawer failure. A light, silicone-based lubricant applied to metal slides every three to six months keeps the motion smooth without attracting dust and grime as readily as oil-based lubricants might. When applying lubricant, focus on the contact surfaces and ensure the slides are clean before treatment. A quick wipe with a dry cloth before lubrication removes grit that can grind away at the slides and the drawer runners.
Interior care is equally essential. The drawer interiors are where your tools and gear live, and moisture is the thief of longevity. Keep the inside dry, and consider lining the bottom with a thin, water-resistant underlayment that can shed minor drips and spills. If the climate swings between hot days and cold nights, be mindful of condensation forming inside drawers during rapid temperature changes. In colder climates, avoid keeping drawers fully closed for extended periods, which can trap moisture and promote rust on metal components. A simple habit of opening the drawers during warmer parts of the day or ensuring some airflow can dramatically reduce humidity buildup inside. Along with moisture management, occasional cleanouts prevent the interior from becoming a magnet for dust, salt, and grit that can abrade finishes and interference with slide operation.
The finishing stage also invites practical enhancements that are easy to implement and pay off in daily use. Consider adding simple labels so you can locate essentials without rummaging. This small organizational upgrade reduces wear from repeated handling and keeps your system looking tidy. If you’re storing valuables or sensitive gear, a lightweight locking mechanism or a secondary security feature can provide peace of mind without complicating daily operations. For some builders, magnetic catches on the drawer fronts help them stay closed in gusty wind or on rough terrain, though you’ll want to test magnets to ensure they don’t interfere with the slides or draw attention to metal dust accumulation inside the cabinet. The goal is to balance accessibility with protection, so your setup remains functional across different hunting, camping, or worksite scenarios.
The design choices you make during finishing will also influence maintenance routines. A well-sealed and properly topcoated drawer system sheds water and resists stains, which means less frequent refinishing. Yet even the toughest finishes aren’t permanent, and routine attention pays off. The goal is not to chase perfection but to maintain a dependable system that continues to operate smoothly after months of exposure to sun, rain, mud, and road salt. To that end, integrate a simple maintenance cadence into your use pattern. A quarterly check-in that includes touching up sun-exposed areas, cleaning hardware, and verifying seals can keep a project looking sharp and performing reliably. If you’re planning to keep the drawers for a long season, consider a mid-season refresh of sealants and topcoats. Re-clean the surfaces, reapply a fresh sealant layer as needed, and recoat the exterior if the finish begins to dull or scratches appear.
With maintenance in mind, you might want to explore additional storage concepts that pair well with a drawer system. For instance, modular elements such as a dedicated tool box or a small, lockable cabinet can be integrated alongside the drawers for specialized gear. This approach preserves the clean, built-in look while expanding capacity and protection. If you’re curious about how storage boxes and integrated truck compartments can be designed to work together, you can explore related ideas here: Protech truck box. The linked resource can offer mounting considerations, alignment strategies, and compatibility tips that mesh with the finishing principles outlined here, helping you plan a cohesive bed storage system rather than a handful of separate components.
As you complete the project, the relationship between form and function becomes tangible. A drawer system that looks great but performs poorly will frustrate rather than facilitate your work. Conversely, a well-finished, weather-ready system with thoughtful maintenance becomes a reliable ally that strengthens your daily routines. The objective is to create drawers that are not only aesthetically pleasing but also simple to operate, quiet in motion, and forgiving to the elements you encounter on job sites or weekend adventures. The finish should feel like a natural extension of the truck—robust, practical, and unmistakably seasoned by use. When you approach maintenance as a regular ritual rather than a one-off task, you extend the lifespan of the materials, the hardware, and the overall integration with the truck bed. In short, finishing touches are not ornamental; they are the ongoing promise that your DIY project will continue to perform when you need it most.
For those who want a deeper handhold on techniques and material choices, a broad spectrum of tutorials and guides is available beyond the DIY chapter you’ve just completed. The combination of careful sanding, robust sealants, thoughtful topcoats, hardware upkeep, and interior care forms the backbone of a durable system that can withstand the weather and the road. By combining these elements with periodic inspection and a measured approach to upgrades, you create a drawer setup that remains dependable across seasons and miles. The cadence you establish now will echo in years of use, turning a well-executed build into a trusted work companion that is as reliable as the truck it serves.
External resource for further guidance: The Home Depot DIY Projects guide offers step-by-step tutorials and product recommendations tailored for outdoor DIY projects like truck bed drawers. You can explore their resources at https://www.homedepot.com/c/AB10054975NA.
From Bed to Built-In: Crafting DIY Truck Bed Drawers with Customization and Upgrades

Every time you step into a pickup bed, you see potential. A flat, open space invites a toolbox, a pile of gear, or a sprawl of loose cargo. The challenge is turning that space into something that behaves as a single, efficient workspace while still leaving room for the unexpected. DIY truck bed drawers are one of the most practical ways to achieve that balance. They offer protection from the elements, a clean line that looks built-in, and the flexibility to tailor the storage to your specific habits—whether you’re a weekend mechanic, a full-time hunter, or a weekend warrior who camps in remote spots. The goal isn’t just to stack a few boxes back there; it’s to craft a system that delivers quiet reliability on every trip, with the ability to reconfigure as your needs shift. The beauty of a well-planned drawer system lies in its modularity and its capacity to fade into the background while you focus on the task at hand. And while the finish, hardware, and layout are important, the heart of a successful DIY drawers project rests in careful planning, weather-conscious materials, and precise assembly that can stand up to sun, rain, dust, and the constant jostling of a moving vehicle.
The first step toward that outcome is deliberate planning. Begin by mapping your bed. Measure the interior length, width, and height with a soft tape measure, and note any wheel wells, bed rails, or tie-down points that might constrain your layout. Leave about a quarter of an inch clearance on all sides to accommodate minor shifts in temperature and movement. A practical rule of thumb is to design for two or three drawers when space allows, though a single deep drawer can work beautifully in a narrower bed. The choice between side-by-side or stacked configurations should reflect how you typically remove gear from the bed. If you frequently reach for tools or spare parts in the middle of a job, a two-drawer, side-by-side plan can reduce reach-time and keep components balanced across the bed.
With the footprint defined, sketch a simple layout that translates the plan into measurable parts. Decide on a loading philosophy: heavy items like jacks, spare tires, or power tools demand stronger underpinnings and full-extension slides that won’t sag over time. Don’t underestimate rough load paths—the bed flexes, especially on uneven ground or when the truck is jostling on a dirt road. A robust frame and proper bracing are essential. The design should be modular enough to adapt if your storage needs change—perhaps you’ll swap a tool tray for a fishing kit, or switch from two medium drawers to one wide tray for bulky gear. A modular mindset also guides you toward using materials that are both durable and forgiving to work with. A practical DIY approach favors exterior-grade plywood for the box and a supporting frame, paired with metal hardware that resists corrosion and the occasional scrape from a stray tool.
Material choice matters as much as the layout. Exterior-grade plywood provides a sturdy backbone with decent moisture resistance, and it holds screws and fasteners securely. For the frame, a combination of plywood and a light steel or aluminum substructure can deliver the best mix of rigidity and weight. If you expect to store damp equipment or items that sweat during transport, consider trays with perforated sections or vented bottoms to promote drainage and air circulation. This reduces the risk of mold and odors over long stretches of use. When you choose fasteners, pick corrosion-resistant screws and add washers to spread load at each connection. Layering the assembly with a waterproof sealant or a UV-rated finish protects the wood from sun and rain. If you’re aiming for a showroom-like finish, a clear polyurethane coating will emphasize the wood grain while granting a protective barrier against moisture.
The sliding mechanism is the hinge that makes the system usable in real life. Full-extension, ball-bearing slides provide the smoothness you expect, even with heavy loads. Mount the slides with exacting precision: ensure they’re aligned and level relative to the bed’s base, not just to the drawer itself. A common pitfall is mounting slides to a surface that isn’t perfectly flat, which leads to binding as the drawer travels. For a clean look and easy maintenance, mount the fixed half of the slides to the bed frame using masonry anchors or bed-side brackets if you’re attaching to a steel frame, and attach the sliding half to the drawer bottom or side. When you test the drawers, run them under the maximum intended load and push them with a steady hand to feel for any snag or misalignment. If you hear squeaks, it’s often a misfit or an over-tightened screw; a light adjustment or a small shim can restore smooth action. Add felt pads or rubber bumpers at the ends to quell noise and cushion the drawer when it closes.
Aesthetics matter, but functionality is king. Weatherproofing the finished surfaces protects both the wood and the fasteners, and it preserves your investment for years to come. Sealants, stains, or paints designed for exterior use can keep your drawers looking sharp after months of sun exposure and rain. A clear, exterior-grade polyurethane preserves the natural beauty of the wood while offering a durable shield; a tinted sealant can also help hide dirt and grime that accumulates with rugged use. If you want a low-maintenance solution, consider using a prefinished exterior plywood or applying a marine-grade sealant to every exposed edge. Inside the drawers, you can line the bottom with a rubber matting or a textured vinyl to keep items from sliding during transit. A non-slip surface is particularly useful when you’re carrying tools that can shift and rattle over bumps.
The function of the drawers can be expanded through thoughtful upgrades. A modular approach makes these upgrades feasible without a full rebuild. You can introduce integrated lighting with discreet LED strips along the drawer perimeter for visibility in dim conditions—an invaluable feature when you’re rummaging for a wrench or a flashlight after dark. Secure latches that are padlock-friendly add a layer of security for tools left in the bed during stops. Drainage considerations become important when you’re working in wet environments or when gear is likely to sweat. Perforated trays or drilled drain holes at the tray bottoms prevent water from pooling and help with air circulation. For items that must stay in place during travel, you can install a simple non-slip liner or a rubber decking that grips equipment without causing damage. These upgrades need not be expensive; they simply require careful planning and a little neat workmanship.
The installation phase ties everything together. Start by fastening the frame to the truck bed with solid brackets or bolts that can withstand vibration and metal-to-wood contact. If you’re mounting directly to the bed floor, drill carefully and use corrosion-resistant hardware. Leave a slim expansion gap—about 1/8 inch—between the drawer sides and the bed walls to accommodate temperature-driven expansion and contraction. A final test with full load ensures that the system remains level and that the drawer sides glide without binding. The first trial run can teach you a lot about where to tighten or loosen fit, and what tweaks will prevent future headaches. In the end, you want the drawers to feel almost invisible when stowed, yet instantly accessible when you need something stored inside. When all is aligned and level, the drawers should run true, close securely, and resist rattle, even on a rough trail.
As you reflect on the process, you’ll notice a rhythm to the work that blends practicality with craft. The decisions you make about materials, bracing, and finishes aren’t just about saving a few extra minutes in the shop; they’re about ensuring the system remains dependable in the field. A well-made drawer unit respects the geometry of the truck bed, distributes weight evenly, and uses hardware that tolerates the vibrations and temperature swings of outdoor use. The result is not merely a storage solution but a set of moving parts that behaves like a single, purpose-built platform. The modular nature of the design invites experimentation: you can reconfigure, expand, or pare down as your needs shift over the seasons or as your gear evolves. That adaptability is what turns a DIY project into a long-term investment in efficiency and ease.
If you’re seeking broader inspiration beyond the fundamental build, you can explore related designs and guidance in a wider set of truck storage guides. For a broader framework and additional layout ideas, consider looking into related truck storage guides that discuss modular frames, integrated dividers, and how to keep gear secure during transport. For a more technique-focused overview of related concepts, a quick reference to a general guide on truck storage design can provide helpful background while you adapt the core drawer system to your bed’s exact footprint. If you want a deeper sense of how a drawer system can be integrated with other bed-mounted components, you can explore a dedicated guide on allied storage concepts, since many builders find value in thinking about drawers in concert with racks, tool boxes, and secure compartments. And if you want a concrete, hands-on reference to see the workflow in action, a detailed step-by-step video tutorial can walk you through measurements, tool usage, and installation tips—perfect for both beginners and experienced DIYers alike. For a visual, step-by-step reference, you can follow this detailed guide: https://www.instructables.com/How-to-Build-Truck-Bed-Drawers/.
In practice, a successful DIY truck bed drawer project balances careful measurement, sturdy construction, and deliberate finishing. It rewards thoughtful upgrades, like interior lighting or locking mechanisms, with a more efficient workspace and greater peace of mind on remote trips or busy workdays. The most important takeaway is to start with a clear plan, choose materials with weather resistance in mind, and assemble with attention to alignment and secure fastening. The bed becomes not simply a place to toss gear, but a well-organized workspace that travels with you. And when the drawers are built to last, you’ll find yourself reaching for tools, not for excuses about clutter. The result is a system that feels custom, even though you built it yourself.
For those who want to integrate this project with a broader portfolio of vehicle-storage solutions, the path is straightforward: apply the same principles of measurement, modular design, and robust hardware to any bed or cargo area, whether you’re outfitting a compact pickup or a full-size work truck. The underlying discipline—precise planning, weather-aware materials, and tested hardware—translates across sizes and configurations. With a little patience, you can transform a plain truck bed into a purpose-built, durable storage habitat that keeps gear secure, accessible, and neatly organized, mile after mile.
Internal link note: If you’d like to see how this concept ties into a broader category of integrated solutions, you can explore related ideas in the truck box guides. The internal resource provides a complementary perspective on how drawers, dividers, and fixed compartments can coexist to form a cohesive storage system. See the truck box guide for more on this approach. truck box.
Final thoughts
In conclusion, creating DIY truck bed drawers provides substantial benefits for business owners in terms of organization and efficiency. With the right materials and step-by-step guidance, you can build a customizable solution that meets your specific needs. Don’t overlook the importance of finishing touches—they protect your investment and enhance the longevity of your drawers. Lastly, personalizing your drawers with upgrades can make them uniquely suited to your workflow. Take the plunge into this project, and enjoy the benefits of a well-organized truck bed.