
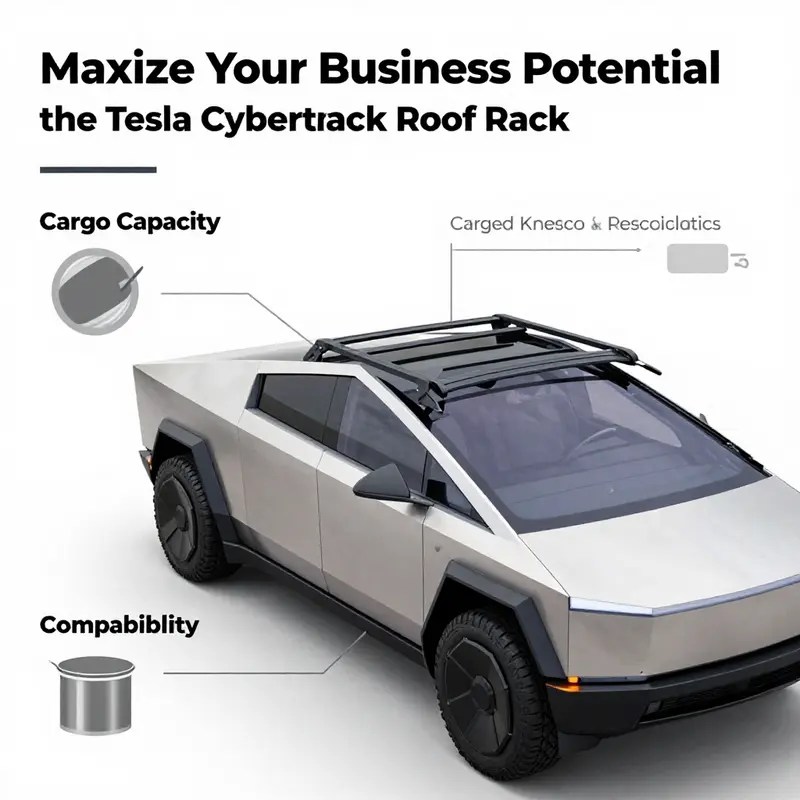
As businesses look for innovative solutions to streamline operations, the Tesla Cybertruck Roof Rack emerges as a prime accessory for owners seeking enhanced cargo management capabilities. Designed for the 2024 and 2025 model years, this robust roof rack allows business owners to transport a variety of goods, from outdoor gear to essential equipment, securely and efficiently. In the following chapters, we’ll delve into the standout features of the roof rack, crucial safety guidelines to follow, specifications including cargo capacity, and comprehensive installation instructions, providing a holistic understanding of how this accessory can benefit your business operations.
Rugged Carriers, Clear Lines: A Deep Dive into a Modular Roof Rack for a Modern Electric Pickup
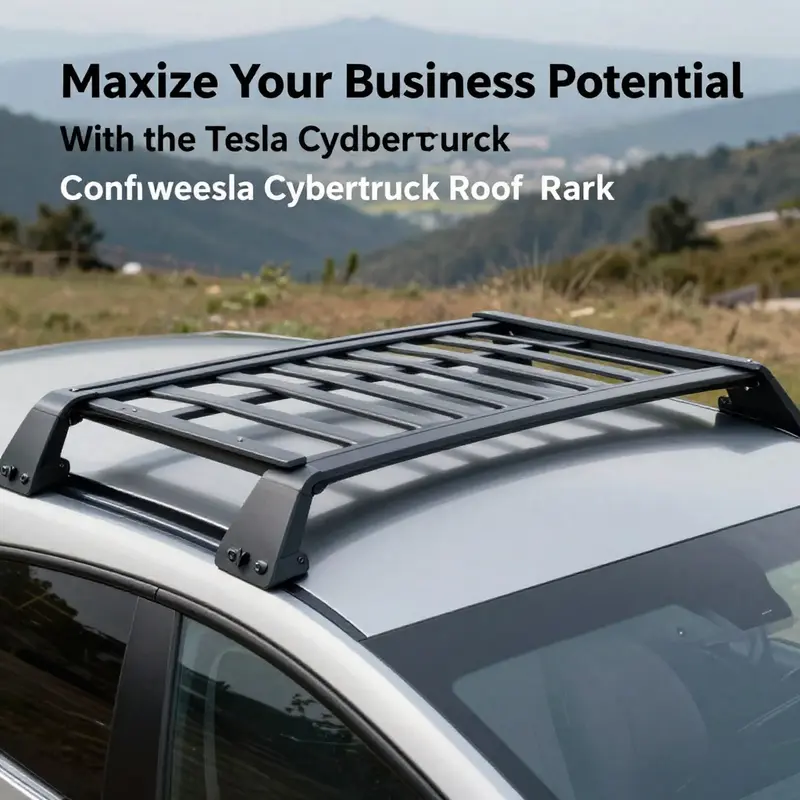
A modular roof rack for a modern electric pickup is more than an accessory. It is a deliberate extension of the vehicle’s utility, designed to carry the gear that turns a weekend into an expedition. This chapter explores the specific system that docks to the roof, a setup engineered to respect the truck’s distinctive silhouette while expanding its potential for outdoor adventure. The design philosophy centers on lightweight strength, durability, and ease of use. Aluminum crossbars form the backbone of the rack, chosen for their balance of rigidity and lightness. They are finished with a powder coating to resist corrosion and maintain a clean, contemporary look that complements the vehicle’s rugged aesthetic. The result is a system that feels integrated rather than tacked on, preserving the vehicle’s lines while adding a practical, high-capacity platform. The choice of material matters not just for appearance but for performance. A lighter framework reduces overall weight and preserves payload efficiency, while the aluminum’s inherent stiffness helps keep items stable at highway speeds or on winding woodland roads. A powder-coated finish protects against road debris, salt, and moisture, which matters for gear that spends long hours in transit and for the rack’s own longevity when exposed to the elements. The aesthetic is important, but it is the functional synthesis of protects-the-roof, protects-the-gear, and protects-the-driver that makes this system compelling. The crossbars sit atop integrated padding and rubber seals that cushion the roof surface, dampen vibration, and minimize the chance of denting or scratching paint during loading and unloading. This thoughtful interface between rack and roof is essential; even small misalignments can create chafing over repeated use. The padding and seals ensure a snug, secure fit without the need for heavy-handed clamps or improvised solutions. It is a quiet partner on the journey, contributing little wind intrusion and allowing the vehicle’s natural aerodynamics to remain largely intact. The load path is designed to be predictable and balanced. Each crossbar aligns with corresponding towers that secure to the roof’s structural points, distributing weight across the strongest sections of the body rather than concentrating it at a single contact point. In practice, that means the rack can accommodate a range of outdoor gear—from bikes to cargo boxes to skis—and keep them steady through ruts, gravel, and highway overtakes. The installation system is equally important. The towers are die-cast, a choice that speaks to reliability and precision. They include built-in locks, a feature that adds security without complicating the loading process. A quick-release mechanism allows for easy installation and removal, a critical benefit for drivers who swap gear with frequency or who need to reclaim roof space for other tasks. No extra tools are required for typical use, which lowers the friction of loading up for a last-minute trip and encourages more frequent use. This kind of user-friendly design matters because a roof rack only unlocks its full value when it is easy to deploy and just as easy to stow away. The system’s raw capacity is a practical line in the sand. It can handle up to two hundred pounds of payload, a figure that covers common outdoor gear with a comfortable margin for secure transport. This rating enables cyclists and snow sports enthusiasts to bring multiple bikes or a couple of ski sets, while families can transport a cargo box and a handful of smaller items without compromising handling. Yet capacity is not the sole measure of a successful rack. How weight is distributed, how the load interacts with the vehicle’s center of gravity, and how the system behaves at different speeds are equally important considerations. The rack is designed to maintain low wind resistance and minimize noise, a nod to the ongoing effort to keep the ride refined even when the roof is carrying gear. The balance between form and function is evident in the rack’s design language. The crossbars echo the vehicle’s angular, forward-looking aesthetic, while avoiding the harsh, industrial lines that would feel out of place. The finish and construction communicate durability and readiness for use, not merely a cosmetic enhancement. The concept behind the entire setup is straightforward: a modular, adaptable platform that leverages the truck’s existing structure to expand its load-carrying capabilities without sacrificing safety or comfort. To that end, the system offers flexibility in how it is configured. It can be employed as a two-piece setup or expanded to a four-piece arrangement depending on the specific needs of a trip. The two-piece configuration provides a compact and lighter footprint, ideal for day trips or camping runs where quick loading and unloading are priorities. The four-piece setup presents a wider, more stable surface, suitable for broader loads or gear that requires more surface area for stabilization. This adaptability reflects a modern approach to outfitting: gear-ready without becoming a permanent burden when not needed. A careful reader might wonder how a roof rack of this kind aligns with the vehicle’s safety and regulatory guidelines. The truth is that the system remains tethered to the vehicle’s GVWR and GAWR specifications, which should be checked on the driver-side door pillar label. Those figures anchor what the vehicle is allowed to carry in total, across axle groups, including any roof-mounted cargo. The need to stay within these limits becomes part of the loading discipline. It also underscores the importance of tire maintenance. When a roof-mounted load is in play, tire pressure should be verified, and tires checked for wear and correct inflation. Underinflated or overinflated tires can alter handling, braking response, and cornering stability, which is especially critical when suddenly encountering a rough patch or a gusty crosswind with a significant roof load. The system’s secure fit reduces the likelihood of lash and movement, but it cannot compensate for negligence in tire care or gross miscalculation of load. Beyond safety, the rack’s practical impact on adventure planning is clear. Its compatibility with a wide range of outdoor activities is one of its strongest appeals. For cycling trips, there is ample room for bikes with appropriate adapters or fork mounts that align to the crossbars. For kayaking or canoeing, crossbar spacing and strap configurations enable secure transport without requiring a dedicated trailer. Snowboard and ski setups benefit from the rigidity of the crossbars and the ability to secure the gear on edge, freeing up space inside the vehicle for passengers or additional equipment. The system’s modularity matters most when the route takes a turn from the beaten path to the remote, where weather and terrain can be unpredictable. In those moments, a reliable, well-attached roof rack becomes the quiet enabler of mobility, helping travelers bring along essential tools, spare parts, or emergency gear without compromising the vehicle’s core design. The installation philosophy emphasizes a tool-free experience that respects the driver’s time and effort. Quick-release towers reduce the friction of reconfiguring the rack for different trips, while integrated locks offer peace of mind in crowded destinations. These small but meaningful details contribute to a sense of confidence that extends beyond the rack itself. The broader context for this kind of accessory is the ongoing evolution of utility in modern pickups. The goal is not merely to add mass to the roof but to create a coherent system that respects the vehicle’s architecture while enabling a broader set of use cases. The boundary between vehicle and gear blurs in a way that reflects contemporary needs: people want to travel light, arrive prepared, and return home with everything intact. In practice, that translates to thoughtful design, careful weight management, and an emphasis on securing gear quickly and reliably. If a reader seeks a route to deeper technical details, the official product page offers a complete specification sheet, installation instructions, and compatibility notes. For readers browsing options and seeking broader context, our Roof Racks guide provides a catalog of alternatives and configurations that are compatible with a range of rugged, modern pickups. See Roof Racks for a broader view of available layouts and accessories. For more detailed technical specifications and confirmation of mounting points, refer to the external resource that outlines the official crossbars’ features and capacity. External references help ground the practical advice in real-world testing and manufacturer documentation. External resource: https://www.tesla.com/vehicle-accessories/cybertruck-roof-rack-crossbars
null
null
Balancing Load and Limits: Understanding the Cybertruck Roof Rack’s Capacity and Specs
Load limits that matter — and how to respect them
The roof rack on the Cybertruck is more than an accessory; it extends the vehicle’s utility while demanding respect for weight, balance, and safety margins. Designed to carry bulky outdoor equipment—canoes, kayaks, bikes, rooftop carriers, and winter gear—the system presents a clear specification: a maximum rooftop load rating that governs everything from how you pack to how you drive. That rating is 220 pounds (100 kg) for the crossbar system when installed and used according to manufacturer recommendations. Interpreting that number correctly means treating it as the ceiling for the distributed weight on the crossbars, not as a suggestion or as an allowance that ignores the truck’s broader payload limits.
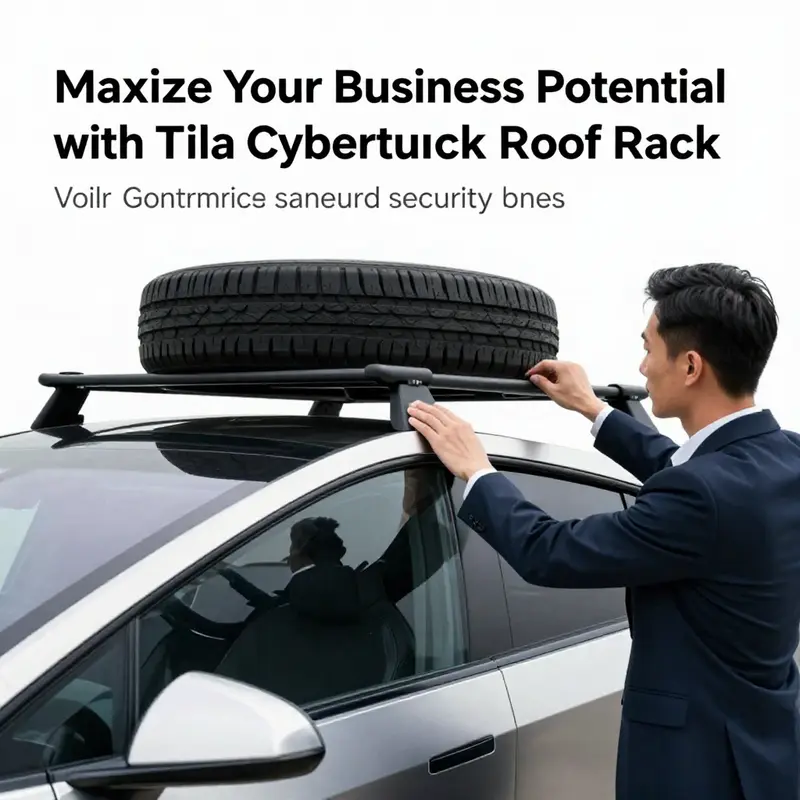
Understanding what 220 pounds represents in practice is the first step toward safe use. The rating covers the load across the entire crossbar assembly, including any attachments and hardware. It accounts for dynamic forces encountered while driving—bumps, wind, and braking—so the static weight of your gear should sit comfortably beneath that limit with a safety margin. For example, two heavy bikes mounted on a rooftop carrier can approach this limit quickly. A single loaded rooftop cargo box with wet gear can do the same. Think in terms of distribution: keep heavier items centered between the crossbars, forward of the rear crossbar when possible, and secured to prevent fore-and-aft movement.
But rooftop capacity does not exist in isolation. The Cybertruck’s Gross Vehicle Weight Rating (GVWR) and Gross Axle Weight Ratings (GAWR) define the absolute maximum mass the vehicle and each axle can safely support. Those figures appear on the Tire and Loading Information Label on the driver-side door pillar and must guide your calculations before you load. A rooftop load of 220 pounds could be perfectly acceptable on its own yet still push total vehicle weight near or beyond the GVWR once passengers, bed cargo, and trailer tongue weight are included. Always add up the weight of occupants, installed accessories, tools, and any cargo in the bed or cabin when determining whether rooftop loading remains safe.
Tire pressure plays an outsized role in rooftop cargo safety. Inflating tires to the pressures indicated on the vehicle label preserves handling, braking, and stability when carrying top-heavy loads. Underinflated tires increase rolling resistance and can alter the suspension geometry under load, which in turn affects steering response and stopping distance. For those who haul frequently or approach rated capacities, checking tire pressures before each trip is the simplest preventive step. When towing a trailer, follow the separate inflation guidelines in the owner’s towing section; the combined stresses of rooftop cargo and towing change the requirements.
Material and build quality are equally important to long-term performance. The crossbars are built from high-strength materials engineered for exposure to weather, UV, and road salt. Coatings and anodizing protect against corrosion and abrasion, while the structural design resists flex under load. Lockable crossbars add security and reduce theft risk for both the bars themselves and mounted gear. When choosing aftermarket attachments, match material and fastening styles to the rack’s specifications to avoid galvanic corrosion or incompatible clamp pressure that could damage rails or bodywork.
Installation and mounting are straightforward when instructions are followed. Proper torque on mounting hardware and correct placement of pads or spacers maintain the structural interface between the rack and the vehicle. The system is engineered to fit model years that share the same roof interface, so owners of compatible trucks can expect a secure fit without permanent vehicle modification. Still, periodic checks of fasteners and mounting points are essential: vibrations from everyday driving can loosen hardware over time, and a quick inspection after the first few hundred miles with a new load can catch issues before they escalate.
Securing cargo for transport is not just about straps; it is about dynamic load management. Use rated tie-downs and soft straps in contact areas to avoid scratching paint or damaging gear. Ratchet straps are effective for large, rigid items, but they must be used carefully to avoid over-tensioning. For items that can catch wind—canoes, kayaks, rooftop boxes—add secondary forward-rated tie-downs to the vehicle’s front to stop forward pitching under sudden braking. Balance is crucial: symmetrical loading reduces yaw tendencies in crosswinds and keeps steering predictable. If you carry irregularly shaped items, consider a load arrangement that places weight low and centered while using the rack primarily to prevent lateral movement.
Weather and environmental factors change how rooftop loads behave. High winds at highway speeds can generate lift and additional stress on mounts. Rain adds weight to canvas covers and can pool in ill-fitting carriers. Snow and ice not only add weight but also can shift and compact in unexpected ways, potentially changing your load distribution mid-trip. Frequent inspections during long journeys or after severe driving events—heavy rain, ice buildup, or highway crosswinds—help maintain safety. When possible, minimize speed and increase following distance while carrying heavy rooftop loads.
Electrical considerations are often overlooked. The cab and bed contain sensors and electrical components that can be sensitive to liquid intrusion. Owners are advised not to store large volumes of liquid loose in the cabin or bed near electronics that could be affected by spills. When carrying liquids on the roof, use sealed containers rated for transport and secure them to prevent tipping. Spills on the roof are unlikely but could seep into seams or run into electrical housings if the vehicle has rooftop wiring for accessories; secure covers and check seals if you mount aftermarket lighting or antennas.
The roof rack’s design mirrors the truck’s aesthetic, but form follows function: the crossbars are shaped to cut wind noise where possible and match the vehicle’s lines. Noise is reduced when loads are streamlined and tied down close to the roofline. Some accessories include aerodynamic fairings or rubber padding to reduce vibration and rattling, improving both comfort and the longevity of mounting hardware. If noise becomes excessive, re-check all mounting points and add vibration-damping materials between gear and the crossbar.
When planning frequent or heavy rooftop use, think about repeated stress over time. Metal fatigue is a real phenomenon when components are repeatedly loaded near their limits. Periodic inspection for hairline cracks, loose welds, or corrosion at stress points prevents in-service failures. Lubricate locks and moving hardware sparingly with appropriate products to keep mechanisms operating without attracting grime. If the rack will be idle for long periods, remove detachable accessories to reduce wind loading and potential theft.
Finally, accessories and add-ons must be chosen with care. Not all carriers, bike mounts, or rooftop boxes are created equal, and pairing an incompatible accessory with the rack can reduce the safe load or introduce fitment issues. Choose attachments that match the crossbar profile and follow the rack manufacturer’s instructions for allowable weight per attachment point. When in doubt, err toward lower loads and balance the cargo between the roof and the bed. For owners interested in exploring compatible options and practical installation tips, a dedicated resource on roof rack accessories provides useful context and product comparisons.
For official installation instructions, fitment details, and the latest accessory specifications, refer to the manufacturer’s online accessory shop for authoritative guidance: https://www.tesla.com/.
For more overviews and practical guides on rooftop systems and related accessories, consult a resource focused on roof racks and their applications, such as this roof rack guide.
Rugged Rails, Ready Trails: Installing the Roof Rack on a Fully Built Electric Pickup
The road ahead invites gear that travels with you, not merely in the bed but above it, where wind and weather become part of the journey. When you outfit a rugged electric pickup with a roof rack designed to carry canoes, boards, or a compact expedition setup, you’re shaping how you move from trailhead to campsite. The rack system in question is built to fit the 2024 and 2025 model-year versions, pairing lockable aluminum crossbars with a substantial haul capacity. It is engineered to complement the vehicle’s rugged silhouette while offering dependable load support and secure cargo management. The design speaks to how a modern truck can blend form and function—not just looking ready for adventure but delivering on the promise of that readiness under real-world conditions. The emphasis is on durability, safety, and a clean integration with the vehicle’s structure, so you can rack up without compromising handling or reliability. In practice, that means a system that stays quiet at highway speeds, resists corrosion, and gives you a predictable platform for whatever the day’s plans require, whether it’s ferrying kayaks to the lake or hauling a ladder and a toolbox to a remote job site. Yet the best performance only comes when you respect the vehicle’s fundamental limits. The vehicle’s GVWR and GAWR, listed on the driver-side door pillar, set the boundaries for payload and axle loading. The roof rack adds a new dimension to those calculations, so a careful approach to weight, balance, and cargo is essential. Alongside load planning, tire pressure is a constant companion to safe handling. In a brisk mix of sun and wind, under conditions that can shift with every mile, maintaining proper inflation helps preserve steering response, braking efficiency, and overall stability. And there is a practical caution that often goes overlooked: the vehicle’s electrical system and sensitive electronics live just behind the skin of the roof. Storing large amounts of liquid or exposing certain components to potential spills is something to avoid, as incursions could threaten electrical integrity. The installation and use of a roof rack, then, are as much about respecting the vehicle’s engineering as about selecting the right gear for the journey. With that mindset, the following account blends methodical steps with a broader understanding of how this system interacts with the truck’s architecture and the terrain you intend to conquer. For those who want a broader sense of how roof-mounted cargo solutions can shape vehicle capability, a helpful entry point is the general roof racks guide, which explores the design choices, load management, and integration principles that apply across many trucks and SUVs. See the roof racks guide for additional context and cross-model comparisons, and then return to the specifics of this installation to tailor the approach to your own setup.
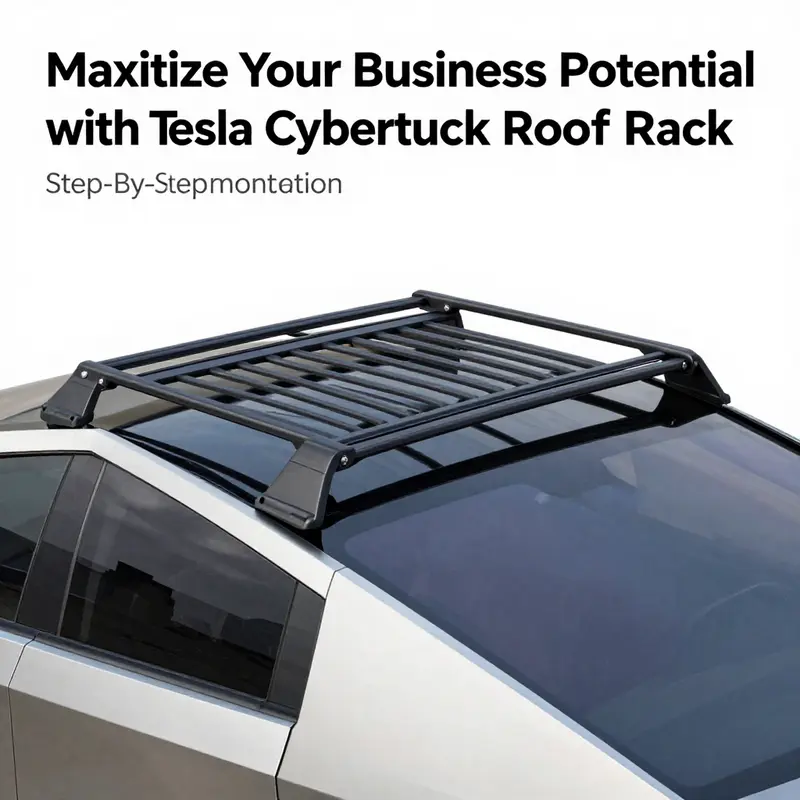
Preparation begins with a simple but important ritual: clean the roof area around the arrow icons on the roof glass, one at each corner of the front and rear sections. A clean, dry surface ensures the anti-slip pads and guide tapes adhere firmly. Once you’ve scrubbed away dust, fingerprints, and any residue, give the area time to dry completely. It’s easy to underestimate the impact of a smudge on a pad’s bite or a guide tape’s edge, but clean contact is the quiet prerequisite for a secure hold when you take to the road. The guidance emphasizes using the roof glass arrows as the alignment beacon for every component. The front corners and the rear corners require slightly different measurements to set the pads and tape precisely. For the front corners, measure 18 millimeters from the front edge of the roof glass, then align the arrow on the glass with the arrow on the guide tape. The guide tape should run along the edge of the roof, tracing the line where the crossbars will eventually anchor. For the rear corners, measure 42 millimeters from the back edge of the roof glass, perform the same alignment with the arrows, and apply the guide tape in the same methodical fashion. These measurements are not merely procedural; they encode the geometry of the rack system so that the pads and crossbars sit in the correct plane relative to the vehicle’s surface. As you lay out the guide tape, you should see a clean, straight line that mirrors the contour of the roof edge, a visual cue that you’ve positioned the elements where they will sit during use.
With the pads and tape in place, the next act is to install the rail clamps. This step requires a clamp tool to carefully retract the rubber seal at the arrow location so the clamp can slip into the opening beneath the glass. Once the clamp is in position, remove the tool and verify that the clamp has clicked securely into the metal receiver beneath the glass. A gentle pull and twist should confirm engagement, and you’ll want to ensure the center of the hook aligns precisely with the arrow mark. Do not rush this part; a misaligned clamp can translate into unwanted movement or uneven loading. Repeat the process at all four corners. After the clamps are seated, you’ll move to attaching the anti-slip pads. Place the left front pad onto the front left rail clamp, then check the orientation with the icon on the pad to confirm correct positioning. Repeat for the other three corners, making sure each pad sits squarely on its corresponding clamp and that the icon on every pad aligns with the clip’s orientation. The alignment is not cosmetic; it’s what keeps the pads grippy under load and stable in wind.
The crossbars come next, and the sequence matters for balance and ease of use. Confirm that all four hooks are properly engaged, aligned, and standing vertical. Then place the longer front crossbar onto the front pads and the shorter rear crossbar onto the rear pads. The geometry here matters: the longer front bar creates the primary load-bearing line, while the shorter rear bar provides additional support and science-based distribution for longer or heavier gear. Once the crossbars are in place, the system moves from passive alignment to active securement. Butterfly nuts are threaded onto each tower, and hand-tightening begins the locking process. The manual torque specification pins the next step: tighten the butterfly nuts to a torque of 2.5 to 3.5 newton meters. This range is deliberate. Overtightening can deform the receiver interface or strip the threads, while under-tightening risks bar movement and cargo instability. After the torque is set, test the system by pulling on the bars in multiple directions. If you feel any play, revisit the nut and tighten a little more, always staying within the specified range. When you’re confident in the click of the lock, align the mark on the butterfly nut with the mark on the tower to secure the locking mechanism. The act of locking is more than a ritual; it’s a fail-safe that keeps the rack from loosening or rotating under load or at speed.
Finalizing the installation is the finishing touch and the part that keeps the system’s profile clean. Install the protective covers by starting at the bottom edge and pressing the roof rack into place along the roof line. The cover acts as a shield against dust and moisture, and it also contributes to the sleek, integrated look that many drivers prize. A well-fitted cover reduces wind noise and helps preserve the polish of the roof area, which becomes especially important on longer trips or repeated daily use. The step-by-step sequence—cleaning, aligning, taping, clamping, pad placement, crossbar mounting, tightening, locking, and final covering—creates a cohesive, dependable platform for everyday cargo and weekend adventures. It is a rhythm that respects the vehicle’s engineering while enabling a broader scope of capabilities for the road ahead.
Beyond the mechanics of installation lies a discipline of responsible use. Weighing the load correctly and distributing weight across the crossbars helps preserve steering feel and braking response. The roof’s role is to translate weight into stability, not to add a sudden challenge to handling. With the system mounted, you’ve expanded the vehicle’s utility without sacrificing its innate resilience. This is the balance that practical design strives for: a robust rack that stays quiet and confident through gusts, undulates, and the occasional rough patch on a dirt road. It is worth keeping in mind that occasional checks are prudent. After the first few trips, re-check the torque on the butterfly nuts and the security of the clamps. In varying climates—hot sun, freezing cold, or humid air—the materials can shift slightly, and a quick inspection can head off potential issues before they become problems. If a storm system or a long haul is planned, consider removing or at least re-tightening the crossbars after travel in high winds or rough pavement. This practice keeps the system performing as designed and avoids long-term wear on the seals and fasteners.
For those who want to explore related concepts, there is value in understanding the broader ecosystem of roof-mounted cargo solutions. A dedicated guide to roof racks discusses how different mounts, clamps, and crossbar configurations interact with various vehicle architectures, offering insights into anti-theft features, aerodynamics, and load distribution. If you’re curious to see how similar systems approach mounting and integration, you can refer to the roof racks overview for deeper context and comparative examples. This broader perspective helps you tailor the installation to your vehicle specifics and regional conditions. For the practical install described here, focus on the precise alignment steps, the corner-specific measurements, and the torque ranges. These details ensure that the system delivers the combination of reliability, security, and ease of use you expect from a capable roof-mounted cargo setup.
As you prepare for the road, remember that the rack is just one piece of a larger equation. A good loading plan considers not only the weight limit but also the distribution of gear across the crossbars, the potential for water intrusion around fittings, and the realities of road vibrations that come with high speeds and uneven surfaces. Keep your battery-powered tools charged for maintenance tasks on the go, and keep a small toolkit handy for quick adjustments. The aim is not only to transport gear but to do so with a calm confidence born of thoughtful preparation. If you want more on the topic of roof-mounted cargo solutions, the aforementioned guide can provide broader context while you refine your setup for specific trips, seasons, or work requirements. For official guidance and visual demonstrations, consult the external resource at https://www.tesla.com/support/vehicle-loading.
Internal link for further reading: for a broader sense of how roof racks integrate with different trucks, see the general roof racks guide. This resource helps situate the installation within a larger framework of design choices, load management, and cross-compatibility that informs any roof-mounted cargo solution. To read more on that topic, visit roof racks.
External resource reference: For official setup guidance, you can consult the external installation documentation at https://www.tesla.com/support/vehicle-loading.
Final thoughts
The Tesla Cybertruck Roof Rack stands out as an essential accessory for business owners aiming to optimize cargo management without compromising on safety or aesthetics. By understanding its features, adhering to safety guidelines, being aware of weight capacities, and following proper installation procedures, business owners can leverage the full potential of their Cybertruck to enhance operational efficiency. Investing in this accessory not only augments the vehicle’s functionality but also aligns with a forward-thinking approach to business logistics and outdoor adventures.