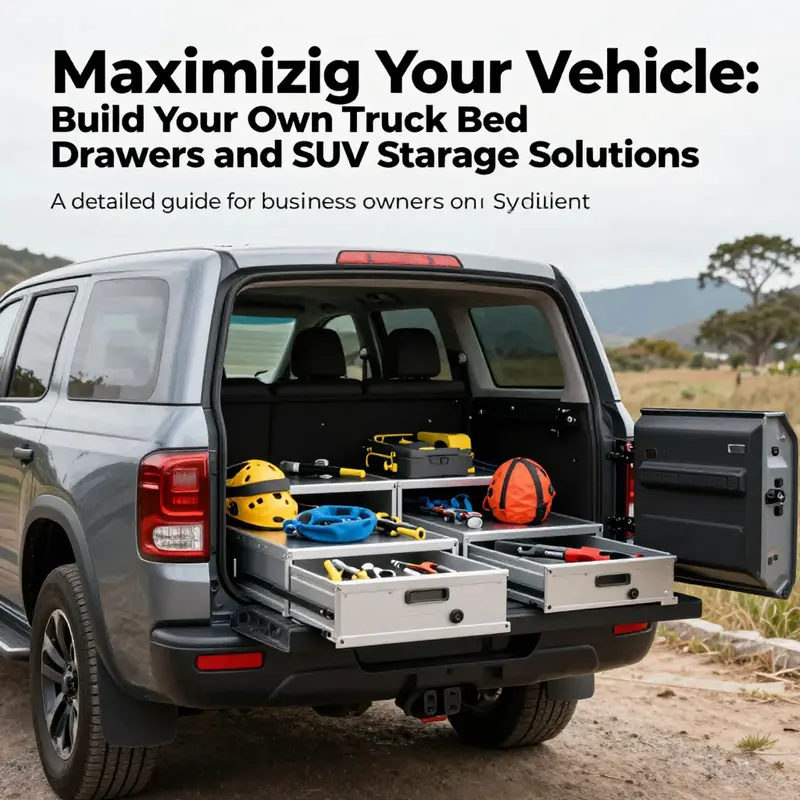
In the competitive landscape of mobile businesses, optimizing every inch of your vehicle for storage can lead to improved efficiency and enhanced service delivery. This article delves into how you can build truck bed drawers and SUV drawer systems tailored for your specific needs as a business owner. By following the outlined steps, you will learn how to choose the right drawer system, measure your cargo space accurately, and build a sturdy frame that supports your operational goals. Each chapter provides valuable insights directly linked to maximizing your vehicle’s functionality, giving you the tools to create a custom storage solution that suits your professional lifestyle.
Picking the Perfect Drawer System: Durable, Smooth, and Fit-for-Adventure Truck & SUV Drawer Builds
Choosing the right drawer system for a DIY truck or SUV conversion shapes the whole project. The choice affects durability, weight, cargo access, and how the vehicle handles on the road. A thoughtful selection makes your drawers feel like an integrated part of the vehicle. Poor choices cause rattles, binding slides, premature wear, and wasted cargo space. This chapter walks through the essential factors to weigh, the trade-offs to accept, and the practical steps to ensure your drawer system performs for years.
Start by thinking about use. Will the drawers carry heavy metal tools or soft camping gear? Will they see daily use or occasional trips? Do you need a removable system for cleaning and flexibility, or a permanent, welded frame for maximum strength? Answers to these questions steer you toward materials, slide types, and mounting choices. Keep function first. Appearance is secondary.
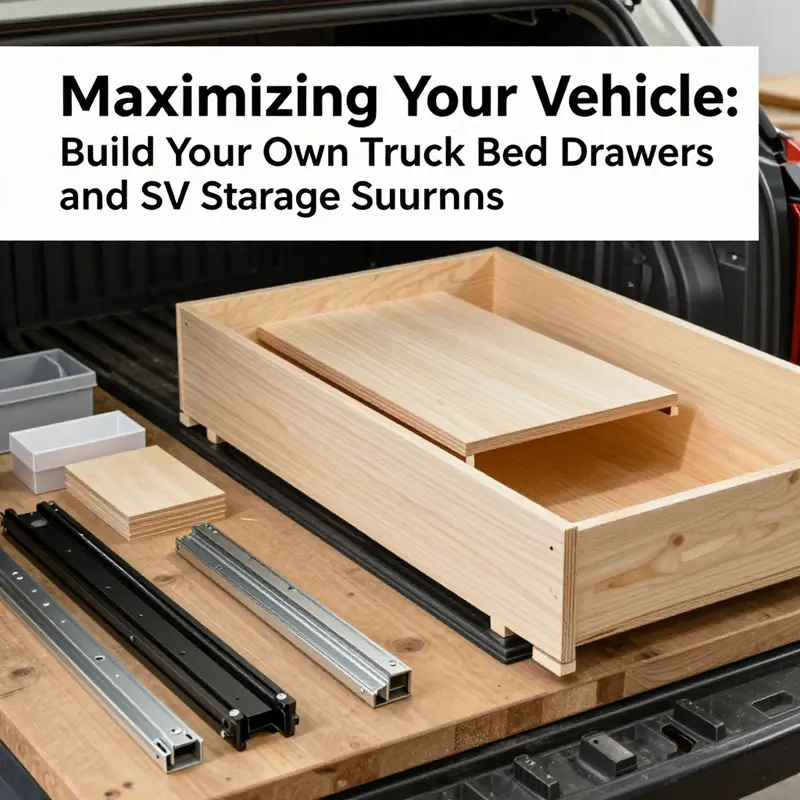
Durability and load capacity are the foundation. Choose materials that match your load profile and environment. Aluminum is a strong choice when you need low weight and corrosion resistance. It resists rust near salt and moisture. Steel provides the highest impact strength. Steel frames take rough bumps without deforming, but they need protective coatings, like powder or galvanic protection, to avoid rust. Plywood is affordable and easy to work with. Use high-grade, exterior-rated plywood if you expect moisture exposure. Plywood decks get heavier and less stiff under constant heavy loads. For long-term durability, prioritize metal for the frame and plywood or composite panels for drawer boxes.
Slides define daily experience. Smooth, full-extension ball-bearing slides let you access the entire drawer. For heavy gear, choose slides rated at a minimum of one hundred pounds per drawer. If you plan to slide loaded drawers while off-road, upgrade the rating further. Look for slides with built-in detents or locking positions. Anti-tilt or anti-drop features are critical if drawers will be opened on inclines or while parked on uneven ground. Properly rated slides prevent sag, binding, and early wear.
Mounting configuration affects cargo layout and security. Side-mount systems attach along the bed rails or along the cargo area sides. They preserve floor space and work well when you need open space above the drawers. Over-bed or wheel-well systems maximize storage by using spaces around the wheel wells, but they often reduce flat floor width. For SUVs with molded cargo areas, build drawers that clear tailgate and folded-seat geometries. Always verify that the mounted drawer clears seatbacks and the tailgate when opened. Take full measurements before finalizing a mounting plan.
A cross-membered frame provides the best support. A robust frame prevents twist and keeps slides aligned. Use steel or aluminum tubing as the primary skeleton. Close spacing between cross members reduces deflection under load. In general, adding a cross support every twelve to eighteen inches keeps the structure stiff. Anchor the frame to the vehicle at multiple points. Where possible, use existing factory tie-downs or bolted attachment points. If you must attach through the bed or cargo floor, use properly sized washers and grade-rated fasteners. Bolted attachments are serviceable and reversible. Welding produces an extremely strong permanent connection but requires planning, protection of factory coatings, and attention to vehicle warranty considerations.
Account for real-world obstructions. Exhaust pipes, suspension components, spare tire vaults, and fuel tank protrusions can limit drawer depth or placement. Measure these carefully and model how drawers will move around them. If the vehicle has a rear seat that folds flat, ensure the drawer does not prevent that motion. Mock up the drawer footprint with cardboard or scrap wood before building the final unit. A trial mockup saves hours of rework.
Think about weight distribution. Heavy drawers put mass over the rear axle. This can change handling, braking, and ride height. Spread heavy items across multiple drawers or place the heaviest loads low and close to the vehicle centerline. If converting an SUV into a sleeping platform, place the bed platform and heavy water or fuel canisters near the center of the vehicle, not out at the tail. Proper distribution keeps the vehicle predictable and reduces stress on mounting points.
Operational considerations matter on rough roads. Drawers should operate smoothly when the vehicle is stationary and when parked on an incline. Choose slides and mounts that allow consistent operation when the vehicle rests on its suspension. Keep drawer tolerances tight enough to avoid wobble, but allow small clearances for dirt and thermal expansion. A small rubber gasket where the drawer meets the face frame reduces dust entry and quiets road noise.
Decide whether the system will be permanent or removable. A removable set of drawers offers flexibility. You can take it out for larger hauls or to clean the cargo area. Removable systems rely on tie-down locations or a small mounting footprint. Permanent systems are typically bolted or welded to the chassis and provide maximum rigidity. Consider a hybrid approach: bolt the frame down using accessible anchor points, but design the inner drawer boxes to be removable. That way, you can service or reconfigure the interior without removing the whole frame.
Security and weather protection deserve explicit attention. Locking faceplates or drawer locks keep valuables safe. A full-width lid or sliding top panel protects exposed drawers from weather and theft. For waterproofing, use sealed drawer bottoms and exterior-rated adhesives. Rubber gaskets around drawer openings block moisture and reduce vibration. If you store electronics or clothing, a sealed compartment or dedicated waterproof tote inside the drawer is a safe choice.
Organization inside drawers increases utility. Divide space into zones for heavy gear, frequently used items, and fragile content. Use small bins, foam inserts, or wooden dividers to prevent tools from shifting. Labeling compartments helps during travel. For specialized needs, include a shallow top tray for small parts and a deeper lower drawer for bulky items. Think in layers: frequently used gear in the topmost tray, heavier gear below. That arrangement reduces the need to unload entire drawers to reach essentials.
Hardware choices may seem small, but they add up. Use stainless-steel fasteners where corrosion can be a problem. For bolted frames, choose lock washers or thread-locking compounds to prevent loosening under vibration. Use bigger washers under mounting points to spread load over the vehicle sheet metal or anchor plate. For slide mounting, use countersunk or pan-head screws sized to the slide manufacturer’s recommendations. Reinforce slide mounting areas with hardwood blocks or thin sheet-metal backing to prevent screw pull-through.
Noise control improves perceived quality. Loose panels, thin plywood, and unprotected metal vibrate. Add closed-cell foam or rubber pads at contact points. Use felt or neoprene tape where the drawer face meets the frame. For large metal frames, apply dampening pads or sound-deadening sheets to the interior faces. Quiet drawers feel premium and reduce driver fatigue on long trips.
Consider electrical and lighting integration. If you plan to add LED strips inside drawers, route wiring through the frame and protect it in conduit or braided sleeve. Use a single quick-disconnect to remove the drawer or the drawer unit without cutting power. Fuse the circuit near the battery and include a manual switch at the faceplate or a magnetic reed switch that turns on lights when the drawer opens. Low-voltage USB power is convenient for mobile devices. Keep electronics in sealed housings to avoid vibration fatigue.
Installation accuracy matters more than raw materials. A slightly misaligned slide causes binding and reduces life. Before final assembly, test fit slides and drawers on a flat jig. Check for full extension, smooth motion, and alignment under load. Once satisfied, transfer the geometry to the vehicle and mark mounting locations. For multi-drawer systems, ensure parallel alignment between left and right slides. Use squares and a straightedge to verify alignment along the length of the slides.
Testing under load is non-negotiable. Load drawers with the weight you expect to carry and cycle them. Shake the vehicle on a rough driveway or simulate bumps to check for movement or rattles. Drive a short loop on familiar roads and listen for unusual sounds. After the first real trip, recheck fasteners and slide mounting points. Tighten anything that loosened. Preventive checks after the first few trips catch issues while they are small.
Maintenance extends life. Clean debris from slide tracks periodically. Lubricate bearings with a light machine oil rated for the environment. Avoid heavy greases that attract dirt. For metal frames, inspect coatings and touch up chips promptly. For plywood drawer boxes, seal exposed edges with epoxy or paint to prevent moisture ingress. Replace worn gaskets and torn foam that compromise weather sealing.
Adaptability allows future change. Use adjustable rails or modular mounting to change drawer locations later. If you think your needs may change, design for modularity at the outset. A modular system also simplifies upgrades, such as swapping a drawer box for a refrigerator unit or a slide-out kitchen.
A final but often overlooked topic is legal and warranty considerations. Some mounting methods, especially welding to the vehicle structure, may affect the manufacturer warranty. If warranty preservation matters, favor bolted attachments using existing anchor points. Always document your installation with photos and a list of bolted locations. Maintain the ability to revert to stock if necessary.
If you want extra inspiration or a step-by-step build reference, consult detailed community guides that walk through frame construction, slide selection, and drawer fabrication. They often include pictures and measurement tips that mirror the steps outlined here. One reliable resource is available here: https://www.instructables.com/Truck-Bed-Drawers-4-Steps-with-Pictures/.
For parts and accessory ideas related to truck storage, check curated company accessory pages for mounting hardware and tie-down ideas. One useful internal resource is the truck accessories page, which helps with mounting and accessory selection: truck accessories.
Choosing the right drawer system comes down to matching design to use. Prioritize a rigid, well-anchored frame. Choose slides that match expected loads. Protect against weather and theft. Organize the interior thoughtfully. Test the system under real conditions and maintain it regularly. With the right choices, your truck or SUV drawers become reliable, quiet, and indispensable. They transform your vehicle into a practical camper or a mobile workshop, ready for whatever the next trip requires.
Measuring the True Footprint: How to Accurately Size SUV Drawer Systems for a Clean, Reversible DIY Bed
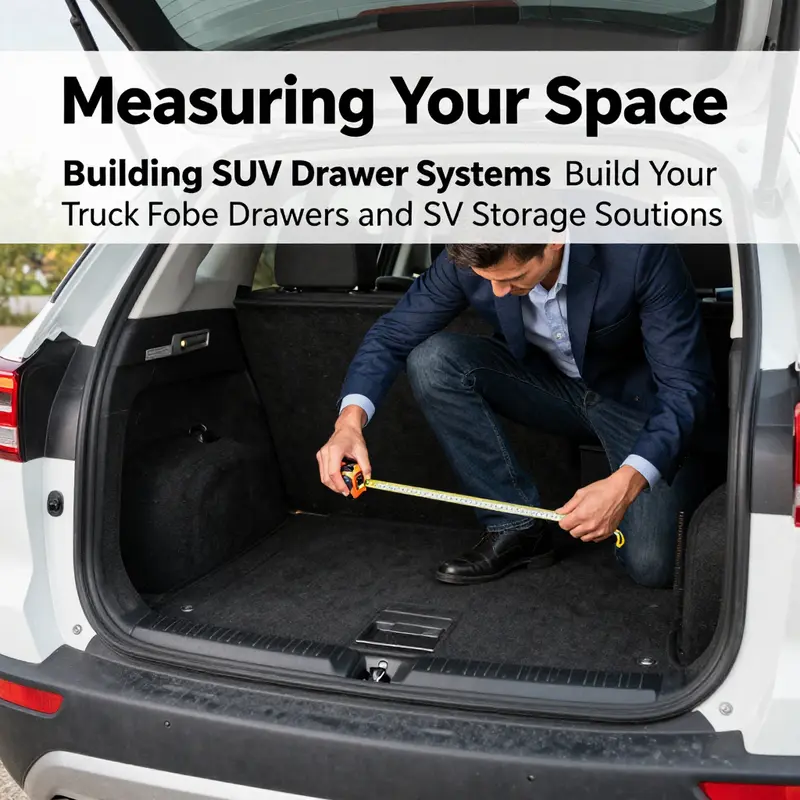
Mapping the true footprint of an SUV’s cargo space is the quiet, deliberate work that makes or breaks a DIY drawer project. It isn’t exciting like cutting or mounting, but it is the step that saves you time, money, and headaches when you start cutting plywood and sliding hardware into place. Accurate measurement is the anchor you return to as you translate a flat plan into a three‑dimensional reality—the moment you know whether two side‑by‑side drawers will fit behind the rear seats or if a single wide unit better suits the space. The goal isn’t perfection in a single pass; it is repeatable accuracy. You want repeatable numbers you can trust when you draft the cut list, order hardware, and test fit components before a single screw is driven. In this phase, patience pays off and improvisation must be disciplined.
Begin by framing the task in terms of what will be stored most often and how you will access it while the vehicle is in motion. Storage in a moving vehicle must not only fit but remain usable under vibration, uneven road surfaces, and varying load. A drawer system that is too tall or too wide can collide with the tailgate, the folded rear seats, or the ceiling. It can also throw off the vehicle’s weight distribution and make handling unstable on rough roads. The measurements you take should reflect both the geometry of the cargo bay and the practical realities of daily use. You will measure the space in several planes and under several configurations.
The core measurements are straightforward but must be taken with care. Start with length: measure from the inner face of one sidewall to the opposite sidewall at the floor, the level you expect your drawer base to sit on. Do not rely on the plastic floor liner as a guide; remove or lift it if necessary to expose the true floor. Next, measure width: this is the distance between the two sidewalls at the lowest, most accessible height you anticipate for the drawer front. In many SUVs, wheel wells intrude into the cargo area and protrude toward the center. The width you record should allow for a drawer shell plus hardware and a little wiggle room for slides. Finally, measure depth or height—first the vertical space from floor to the lowest obstacle above, such as the parcel shelf, folded seats, or a roof‑rack mounting plate. Then measure the horizontal depth—from the back of the drawer front to the rear wall of the cargo area. Depth is critical because drawers, rails, and any subframe will occupy space you also need for cargo when the drawers are opened or closed.
These three dimensions are not solitary numbers; they are a lattice you will test against as you refine your plan. The next layer is recognizing obstructions that can derail a clean fit. You must account for wheel wells, spare tires, exhaust components, fuel lines, and suspension brackets that may intrude into the space you want to use. If the cargo area has a raised floor or a removable tray, record both the floor height and the space beneath it. Don’t forget to plan for the tailgate. A drawer that rises tall enough to strike the tailgate or to shadow the tailgate’s hinge when open will frustrate every use angle. If you intend to fold the rear seats, measure with the seats both up and down. The geometry will shift subtly but meaningfully, and you want to know how your drawer system behaves in each configuration.
To anchor these measurements in real life, imagine the space as a combination of three planes: a fixed base, a movable interface (the drawer), and the space above the drawer (the opening through which you access items). The base is the floor of the cargo area. The interface is your drawer unit with its slides and front face. The opening is the clearance above the drawer when it is fully extended and when it remains stowed. You want this triad to align with your primary use case, whether that means quick access to daily gear, a full kitchen setup for camping, or a mobile workshop. When you capture measurements, you must think in terms of this interface. A unit that is too high will impede headroom or seating positions; one that is too shallow may force you to crumble tools or stack items awkwardly.
One practical strategy is to approximate the plan using temporary blocks or cardboard cutouts placed on the cargo floor. This approach lets you visualize the footprint without committing to cuts. Place the blocks where the drawers would sit, closely tracing the wheel wells and any intrusions. Move the blocks around to simulate two narrow drawers side by side or a single, wide unit. With the blocks in place, test the access angle when the tailgate opens and when the rear seats fold. You can sit in the vehicle and operate the drawer from multiple seating positions. This tactile test often reveals clearance issues that a tape measure alone cannot show. If you find a pinch point, measure the exact clearance and note it in your plan. These notes will guide you as you specify the drawer height and the necessary reveal around the drawer fronts.
A key part of measuring for a DIY drawer system is planning for future changes. Vehicles are dynamic: you may reconfigure the seating, add or remove cargo bags, or swap in different tools for a camping trip. To accommodate this, design around adjustable rails and modular drawer boxes rather than fixed, one‑size installations. Adjustable drawer rails give you the flexibility to tweak the drawer height, the front facing, and even the number of drawers after your first test fit. The hardware you choose should offer enough load capacity to handle the items you carry and enough fine adjustment to accommodate minor shifts in packing style. After all, a well‑measured plan that anticipates adjustment is a plan that saves you from rework.
The measurement process also benefits from a clear mental model of how you will use the drawers when the vehicle is moving. Think about reach, posture, and line of sight. In a moving vehicle, you want drawers that are easy to open from a seated position without twisting your torso. You may prefer shorter drawers that sit lower to the floor for stable weight distribution or taller drawers for deeper storage. Either choice should align with how you load items such as tools, cooking gear, or clothing once you are in camp. If you expect to haul heavy items, plan for lower drawers that can take the load without buckling or binding the slides. If you will store lighter, frequently accessed items, higher drawers can keep them within easy reach while freeing up the floor space for bulkier gear. In all cases, the drawer bottoms should sit above the floor to protect contents from road grime and water.
The topic of measurement cannot be separated from planning for how the drawer system will be integrated into a broader bed conversion or camper setup. A common approach is to frame the base on the cargo floor with a simple, sturdy skeleton that does not permanently alter the vehicle. By using a frame that rests on the floor and brackets that anchor to the chassis, you can avoid drilling into the body while still achieving a stable platform. In this approach, the drawers become a modular component of a larger system. The frame should be engineered with cross supports at regular intervals—typically every 12 to 18 inches—to maintain rigidity and prevent wobble when the vehicle is in motion. If you choose to do a more permanent installation, you can switch to a welded or bolted frame with reinforced brackets. Either path benefits from precise measurements: the more you know about how much space the frame will occupy, the more accurately you can tailor drawer dimensions, slide length, and front profiles.
As you translate measurements into a cut list, keep the principle of proportionality in mind. The goal is not to fill every cubic inch with drawers but to balance accessibility, weight distribution, and usable cargo space. If the space is tight, you may opt for two slim drawers rather than one wide unit. Slim, modular drawers can be grouped to maintain a low center of gravity and reduce the chance of tipping during cornering or off‑road use. When you choose the drawer height, plan for the depth of the slides as well. A well‑sized drawer front can lend a clean look and protect the contents from weather and dust; a front that is too tall can make the drawer hard to open while the vehicle is moving. The exact dimensions will only become crystal through iterative testing, not by a single measurement session.
In the end, the art of measuring for an SUV drawer system is a blend of numbers, practical testing, and mindful restraint. It asks you to imagine how the space will be used across seasons, trips, and road conditions. It invites you to treat the cargo area as a living workspace rather than a static cavity. The more you measure, mock, and adjust, the closer you come to a system that feels like a factory solution—reliable, accessible, and reversible if you ever want to revert to stock. For readers who want a tangible, example-driven view of this translation from plan to build, a practical guide to non‑permanent, no‑drill drawer setups is worth exploring. See the linked Truck Box guide for a detailed walkthrough of dimensional planning and rapid testing that stays gentle on the vehicle while you learn. The internal link offers a straightforward model you can adapt to your own measurements and needs.
When you finish this measurement phase, you will have a robust set of numbers and a clear sense of how the drawer system should sit within the overall space. You will know whether you can nest two slim drawers at the rear or if a single, shallow unit with a shallow lip works better. You will understand how much headroom you have for a potential ceiling clearance or a roof rack, should you expand your build later. You will also have a realistic sense of how much floor space remains for other gear—an essential factor when planning how to allocate weight and balance to maintain predictable handling on the road. The next steps flow naturally from these measurements: drafting a precise cut list, selecting hardware that supports a smooth, quiet operation, and constructing a mock‑up to verify fit before any permanent work begins.
One practical real‑world note helps tether this advice to the kind of testing that makes DIY builds dependable. After you finalize the measurements, test everything with real‑world loads. Load the drawers not just with light items but with the kinds of gear you would actually carry for camping, long trips, or work days. Push the drawers in and out, test the opening angles, and listen for noise from edges or gaps. If you hear rattling, recheck the fit and add edge sealing or weather stripping where needed. This testing phase is your final quality check before you commit to a full build. It is a chance to optimize the reveal around the drawer fronts, prevent dust intrusion, and ensure weather sealing at the drawer edges.
For readers who want a concrete, hands‑on example of how these measurements translate into a ready‑to‑install system, the Truck Box guide linked above provides a step‑by‑step demonstration of a compact, reversible approach. The page walks through layout ideas, including how to place two narrow drawers side by side versus a single, wide unit, and it highlights how to use adjustable rails to accommodate tiny changes in your space after the first test fit. Consider this resource a practical companion when you are ready to turn numbers into a functional, road‑tested storage solution.
External reference for visual guidance on measurement and installation: https://www.bilibili.com/video/BV1Xt4y1k7cK
Solid Ground: Crafting a Rugged, Reversible Frame for DIY Truck Bed Drawers
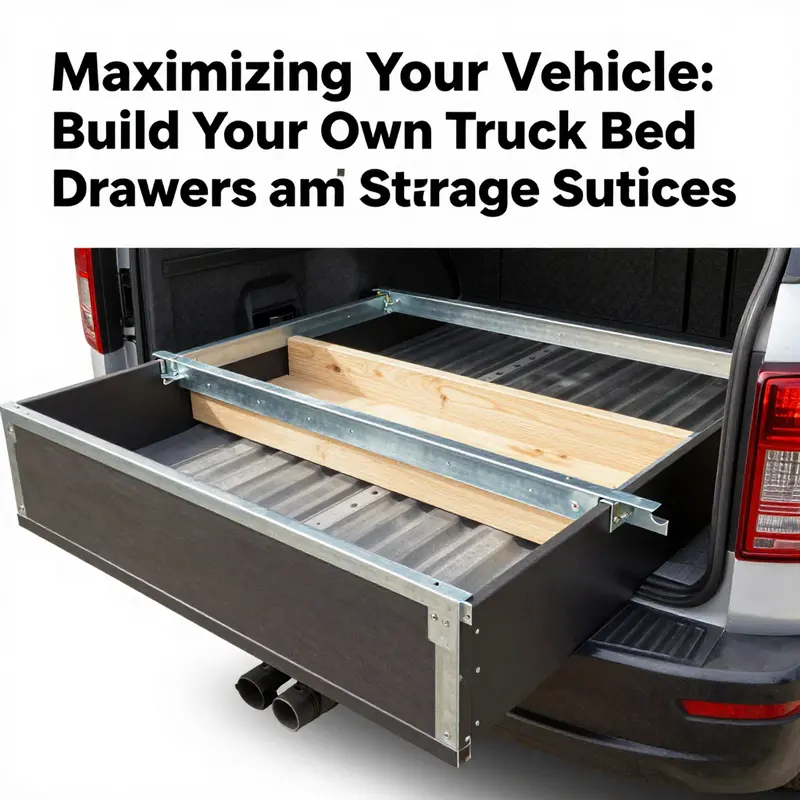
The frame you build for truck bed drawers is not merely a box on wheels. It is the stage on which every piece of gear will perform, from heavy tools to camping supplies. A frame that is square, rigid, and securely anchored to the bed floor makes the whole drawer system solid and predictable. Without a robust frame, the best slides and drawers can still misbehave on rough roads, shift under braking, or wear unevenly where metal meets the vehicle. Framing is the invisible backbone of a DIY storage system, and its quality sets the tone for durability, load handling, and the ease of future changes. The goal is to create a foundation that remains true through miles of rough terrain and still allows for easy disassembly if the layout needs to be reconfigured or the drawers moved to another vehicle later on. This is where material choice and sound construction practices come together to deliver long term performance, not just a temporary fix that looks good in photos but tests poorly on the road.
When you plan a frame for drawers, start with stability. You want a geometry that resists racking and torsion as the vehicle moves through uneven pavement, gravel, or washboard. A frame tied directly to the cargo floor can sometimes be too rigid for every road surface, but a well designed frame that uses cross bracing and carefully placed attachment points can absorb and distribute load without transferring every vibration into the drawers. The frame should be tall enough to clear the wheel wells and low enough to keep center of gravity reasonable, but flexible enough to accommodate different drawer configurations. If you intend to swap drawer sizes or run a two drawer setup side by side, your frame should permit adjustments without major rework. This is where modular framing shines, offering a way to adapt to new drawer dimensions without rebuilding the entire base from scratch. A thoughtful frame can also minimize noise and rattling by creating a continuous contact path with the bed and by using vibration dampers at critical touchpoints.
Material selection is the first major decision, and two paths dominate this discussion: aluminum extrusions and wood. Aluminum profiles, often sold as modular framing systems, are celebrated for their light weight, stiffness, and corrosion resistance. They lend themselves to precise, repeatable joints when used with compatible T slot fittings and corner brackets. This predictability is a boon when you want to install multiple drawers and know that their alignment will stay true after many miles. For a DIY bed that is meant to come apart for cleaning or seasonal changes, aluminum framing also offers the advantage of modularity. You can add or remove sections, relocate cross braces, or reconfigure drawer widths with less effort than with solid wood. The reinforcement techniques with aluminum are straightforward: corner gussets for each joint, cross bracing to tie vertical members, and careful attention to fastener selection to avoid cracking the profiles themselves. If you expect to travel in challenging conditions, you might also appreciate the ability to replace a damaged brace without disassembling large sections of the frame. A modular aluminum frame can feel almost like a construction set, enabling rapid iteration as you refine fit and function.
Wood finishes the spectrum with a different mix of strength and practicality. Hardwood such as oak or maple has proven wear resistance and quiet performance when used for heavy duty frames. The joints demand precision—mortise and tenon, dowels, or reinforced with metal brackets—to prevent sagging under load and to keep fasteners from loosening. With wood you face moisture and temperature shifts inside a vehicle, which can lead to warping if the frame is not properly protected. A robust approach includes sealing all exposed surfaces with a durable finish like polyurethane or marine grade varnish, then using quality wood glue and high grade screws designed for structural work. Even with finishes, wood can expand and contract; the frame benefits from allowing a little relief at crucial joints and from using mechanical fasteners that stay tight as the environment changes. The payoff is a frame that feels solid and almost gives you the impression of a carpentered piece in a workshop, not a temporary rail set in a cargo area.
Whichever path you choose, the fundamental practice is to build to a precise square. A truly square frame is the bedrock of drawer alignment. Start by laying out a rectangle on the bed floor space and checking diagonals. A carpenter’s sense helps you verify right angles, but the decisive test is the equality of the two diagonal measurements. If you can slide a thin tool between opposing corners and feel slight misalignment, you know you must rework the joint or add shims until both diagonals match. It sounds simple, yet it is the difference between drawers that glide and drawers that bind. Once you are confident in the frame’s squareness, the next step is secure attachment to the bed. The frame should anchor to the bed floor across solid points, not merely to surface material. For a permanent setup, through bolting with large washers and proper torque is the reliable route, ensuring the frame cannot rack or shift under load. For a reversible or semi-permanent approach, you can use high strength bolts that can be removed with standard tools after loosening a few fasteners, but even then you want to distribute load with backing plates or clip in brackets that spread stress over a larger area rather than concentrating it in a few points. Rubber bumpers or non-slip pads placed at contact points help damp vibration and prevent metal to metal contact that can wake the entire rig during a long road trip.
In the discussion of construction practices, the choices you make about joints and bracing pay off in the long run. For aluminum frames, cross bracing becomes part of the standard recipe. Place braces between vertical supports at regular intervals roughly every twelve to eighteen inches, depending on drawer width and anticipated load. The braces should be secured with fasteners designed to tolerate vibration without loosening. Reinforcement gussets at corner joints are essential; they prevent the frame from folding at the most stressed intersections when heavy loads press outward as the vehicle negotiates uneven terrain. If you lean toward wood, similar logic applies, but you must compensate for potential wood creep over time. Use metal brackets on corners in addition to mortise joints or dowels, and whenever possible, apply a moisture curing seal to the end grain to reduce absorption. The aim is not only to resist vertical load but also to limit lateral movement that could throw drawers out of alignment during a sudden stop or a sharp turn.
Attachment to the bed floor deserves careful attention. A frame that relies solely on friction or a few surface screws risks shifting. Given the harsh environment inside a vehicle, it is prudent to use through bolts or long screws that engage the bed structure. If you are working in a space where drilling into the vehicle is undesirable, consider a hybrid approach that uses anchor points attached to existing floor hardware and a few strategic through bolts in reinforced spots. The goal is reliable contact between the frame and the floor, with a distribution of force across multiple fasteners. Rubber bumpers or non-slip feet at the frame’s bottom surfaces not only reduce noise but also minimize vibration transfer to drawers and their contents. When you test the assembly under load, check that the frame remains level and that the drawers sit squarely within their guides. A small misalignment here compounds quickly as you add gear and fuel and water jugs, so early detection and correction save a lot of headaches down the line.
There is also value in thinking ahead about drawer dovetails with the frame. Your frame should not obstruct drawer slides or limit their travel. Make sure the frame height aligns with the slides mounting plane, and leave a little extra space for the slide bearings to clear any debris that might find its way into the cargo area. If you plan on multiple drawers stacked in a tall configuration, ensure the vertical supports carry the weight with minimal deflection. The frame should feel rigid not only horizontally but vertically, so cross braces and gussets form a continuous skeleton that resists racking under cornering, braking, or uneven loading. It is this careful, patient approach to frame construction that makes the drawers operate smoothly when the vehicle is fully loaded and on the move.
Beyond the nuts and bolts, there is a practical mindset to framing that often gets overlooked. The best frames are not the most expensive or the most complex but the ones designed with the end user in mind. They anticipate how the driver will access the drawers at a campsite, in a dim cabin, or at a maintenance site in the rain. They accommodate quick disassembly if the bed conversion is temporary or seasonal. They provide access to power outlets, lighting, or charging ports without forcing a redesign of the frame. They balance strength with weight so that the vehicle’s overall mass remains manageable for fuel economy and performance. In short, the frame is the quiet enabler of all your other clever storage ideas. It is the difference between a clever concept and a durable solution offering years of reliable service.
If you are exploring aluminum framing more deeply, a practical touchpoint is the use of modular corner brackets and T-slot connectors that allow fast, repeatable joints. This is precisely the kind of approach that makes it easy to reconfigure or extend the frame as needs evolve. A frame built with such components tends to stay square longer because the joints resist creeping under load, and you can add cross bracing without cutting new pieces to fit. For readers who want a deeper, more technical dive into aluminum framing systems and proper fastening methods, a trusted resource outside the vehicle world offers detailed methodologies and examples. The discussion here is about how those principles translate to a mobile storage frame, not about copying a specific industrial installation. If you want a broader theoretical backdrop, the official guidance from a modular framing expert can be a great reference.
As you move from theory to practice, remember that your frame design should accommodate the reality of a mobile workspace or camper. If your goal includes an under-drawer bed or a hidden storage compartment, the frame needs to be adaptable to these features. The bottom line is to create a frame that stays true under load, resists vibration, and remains accessible during travel. A well constructed frame earns trust every time you open a drawer and find the hardware sliding smoothly, the items inside staying put, and the entire setup still square and true after a long, rough drive. That trust is what makes the whole project feel like a durable solution rather than a temporary hack.
For readers who want to see how these framing ideas translate into real world builds, there are numerous pathways to learn and iterate. One practical shortcut is to study efficient, non-permanent framing methods that still deliver strength and reliability. A common theme across successful builds is to keep the frame modular and adjustable. This allows you to swap out drawer sizes, reposition supports, or even relocate the entire system to another vehicle without starting from scratch. The combination of modular components, precise squaring, and well considered attachment points yields a frame that is both practical and enduring, a sturdy spine for your DIY truck bed drawers that supports your gear and your adventures for years to come. In the end, a frame that holds its shape under load, resists vibration, and remains accessible after miles of road work is not a luxury but a necessity for a system you can trust on the road, at a campsite, or at a job site.
As with any DIY project, taking the time to plan the frame with care pays rewards in the long run. The numbers that matter are not just the thickness of the wood or the profile of the aluminum, but the way those parts work together to resist movement, distribute weight, and provide a stable base for drawers that glide with little effort. The best frames are not the most elaborate, but the most purposeful. They reflect a careful balance between strength, weight, modularity, and ease of maintenance. If you build with these ideas in mind, your DIY truck bed drawer system will not merely function; it will endure the road, season after season, and remain flexible enough to adapt to your changing needs.
Internal resource note: for a deeper look into aluminum framing and modular hardware that can inform your frame design, you can explore a dedicated guide that mirrors this approach. It helps to connect the concepts discussed here with a broader framing methodology that favors precision and ease of modification. Readers who want to explore this further can follow the internal link to a detailed resource on aluminum framing techniques. Merritt aluminum.
When you reach the point of assembling and installing the frame, keep a journal of fit and finish. Record measurements, note any deviations from square, and document how you resolved them. Use this log when you assemble future frames or when you modify the current one. It is the practical byproduct of a design that respects the realities of moving cargo inside a vehicle. A well documented process makes future upgrades, maintenance, and even full reconfigurations much easier. Finally, test the frame under load before you hit the road. Load the drawers with weight similar to what you expect on a daily basis, drive over a few test sections, and listen for rattles, watch for flex, and verify that each drawer opens and closes smoothly. If something feels off, tighten a connection, add a brace, or adjust the mounting points. Small adjustments here can yield big improvements in performance and longevity.
External resources note: for more technical framing guidance, see the external resource on aluminum framing methods and fastener practice. The link provides a broader context for understanding how a frame built from aluminum profiles behaves under load and vibration, which can inform your choice between aluminum and wood for your specific use case. https://www.thealuminumcarpenter.com
Final thoughts
Building your own truck bed drawers or SUV storage systems can significantly enhance the functionality of your vehicle, making it a valuable asset for your mobile business. By choosing the right materials, measuring your space with precision, and constructing a sturdy frame, you create a tailored storage solution that meets your needs. This investment in your vehicle not only improves organization but also boosts your overall operational efficiency, allowing you to focus on delivering excellent service to your customers. Stay ahead in the competitive market by harnessing the power of effective vehicle storage solutions tailored to your business.